

Refreshing a Windows 7 Computer to Windows 10 using USMT and SCCM
Founder of System Center Dudes. Based in Montreal, Canada, Senior Microsoft SCCM Consultant, 8 times Enterprise Mobility MVP. Working in the industry since 1999. His specialization is designing, deploying and configuring SCCM, mass deployment of Windows operating systems, Office 365 and Intune deployments.

Benoit Lecours
PresidentTable of Content


Share


Get the latest insights and exclusive content delivered to your inbox
Since SCCM 1511, you can use the new upgrade task sequence to easily upgrade a Windows 7 computer to Windows 10. But what if you want to upgrade a computer from a 32-bits operating system to Windows 10 64-bits ? You can’t use the upgrade task sequence for this specific scenario. Another reason would be that your company decided to use the wipe and reload option in your Windows 10 migration project. In those cases you will need to use USMT to capture data and settings from the users profiles before applying the new operating system.
This post will describe how to upgrade a 32-bits computer to Windows 10 64-bits using USMT and SCCM. This post will be using hard-links without using a State Migration Point. Continue reading if you are not familiar with those terms, we will explain it later.
Since you’re at the step of deploying Windows 10, we assume that you already installed at least SCCM 1511 and the latest Windows ADK before reading this post. If not, read our related posts :
USMT Basics
Let’s start by giving a couple of facts about the User State Migration Tool :
- Latest USMT version is 5.0
- Latest Windows ADK 10 includes the latest version
- Supports capturing data and settings from Windows Vista and later (including Windows 10)
- Supports restoring the data and settings to Windows 7 and later (including Windows 10)
- Supports migrating from a 32-bit operating system to a 64-bit operating system, but not the other way around
What gets Migrated
By default, USMT migrates many settings (user profile, Control Panel configurations, files, and more). The default configuration files that are used in Windows 10 deployments are MigUser.xml and MigApp.xml. These two configurations files migrates the following data and settings:
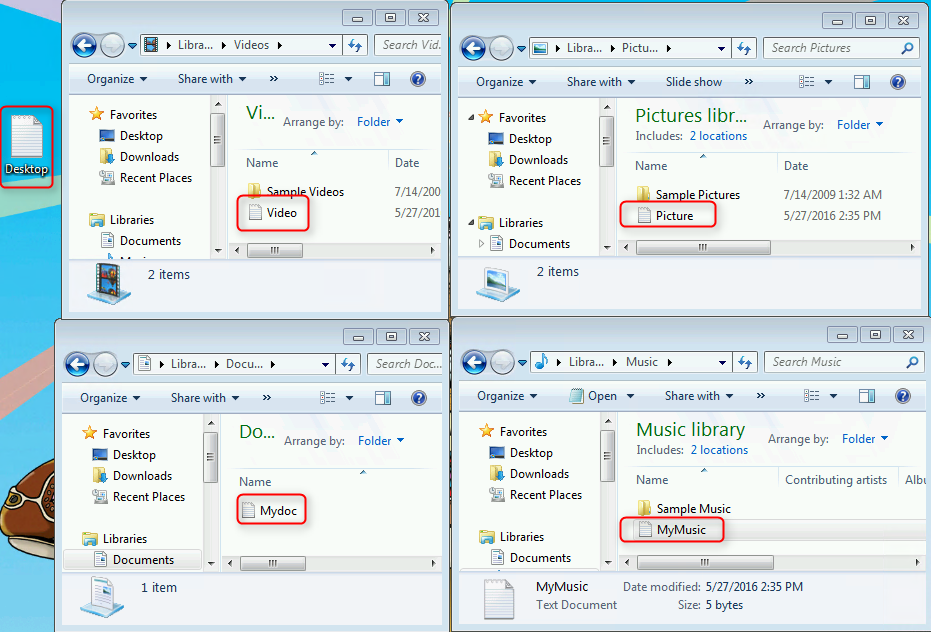
- Folders from each profile (My Documents, My Video, My Music, My Pictures, desktop files, Start menu, Quick Launch settings, and Favorites folders)
- USMT templates migrate the following file types: .accdb, .ch3, .csv, .dif, .doc*, .dot*, .dqy, .iqy, .mcw, .mdb*, .mpp, .one*, .oqy, .or6, .pot*, .ppa, .pps*, .ppt*, .pre, .pst, .pub, .qdf, .qel, .qph, .qsd, .rqy, .rtf, .scd, .sh3, .slk, .txt, .vl*, .vsd, .wk*, .wpd, .wps, .wq1, .wri, .xl*, .xla, .xlb, .xls*.
- Operating system component settings
- Application settings
If needed, you can create a custom configuration files to includes more files types or settings. See the following Technet post for detailed instructions.
For more details on what USMT migrates, see this Technet article. For more information on the USMT overall references, see this Technet article.
Where to Store the User Data and Settings
You can capture USMT data locally (Hard-links) or remotely using a State Migration Point in SCCM (File Copy).
- Hard-link migration takes advantage of advanced features of the NTFS file system that allow files to physically remain in-place and intact even after the drive is wiped (not formatted). When restored, pointers to the files are restored, so the files never physically have to be copied or moved outside the machine. To use hard-linking, select the Capture locally by using links instead of copying files option in the Capture User State task
- File copy: If hard-linking is not selected, the traditional file copy method for storing user state is used. This file copy method literally copies all identified user state data to an alternative location requiring extra disk space and extra time to complete the copy
[su_box title=”Warning” style=”glass” title_color=”#F0F0F0″]You cannot use a State Migration Point and use hard-links to store the user state data at the same time.[/su_box]
- To store the user state data on a state migration point (File Copy), you must first Configure a state migration point to store the user state data
- To store the user state data on the destination computer for update deployments (Hard-Link), you must :
- Add Capture User State steps to your task sequence and configure it to use local folder using links
- Add Restore User State steps to your task sequence and configure it to restores the user state using those links
[su_box title=”Warning” style=”glass” title_color=”#F0F0F0″]The user state data that the hard-links reference stays on the computer after the task sequence removes the old operating system. For that reason, you cannot format and partition a drive if you are using USMT. The disk is will be wiped during the Apply Operating System step of the task sequence. If you must format and partition but still want to use USMT, consider using user state migration points, which is network based.[/su_box]
This post will focus on the hard-links option and will not describe how to customize the task sequence to use the state migration point.
Verify SCCM Windows 10 USMT Package
To store the user state locally or on a state migration point, you must create a package that contains the USMT source files that you want to use. This package is used in the Capture User State step of the migration task sequence.
- Open the SCCM Console
- Go to Software Library / Application Management / Packages
- Right-click the User State Migration Tool for Windows 10 package and select Properties
- On the Data Source tab, ensure that the package is using the ADK 10 – Which is per default C:\Program Files\Windows Kits\10\Assessment and Deployment Kit\User State Migration Tool
- Right-click the User State Migration Tool for Windows 10 package and select Distribute Content

- If you have no User State Migration Tool for Windows 10 package, just create (without any programs) and distribute it
Creating the Capture and Restore User State Data Task Sequence
To capture and restore the user state, you must first create a new task sequence, but before, we’ll explain the different options in the User State Menu :
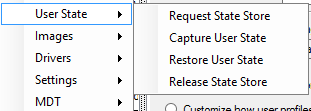
- Request State Store : This step is needed only if you store the user state on the State Migration Point
- Capture User State : This step captures the user state data and stores it on the State Migration Point or locally using hard-links
- Restore User State : This step restores the user state data on the destination computer. It can retrieve the data from a user state migration point or from hard-links
- Release State Store : This step is needed only if you store the user state on the State Migration Point. This step release this data from the State Migration Point
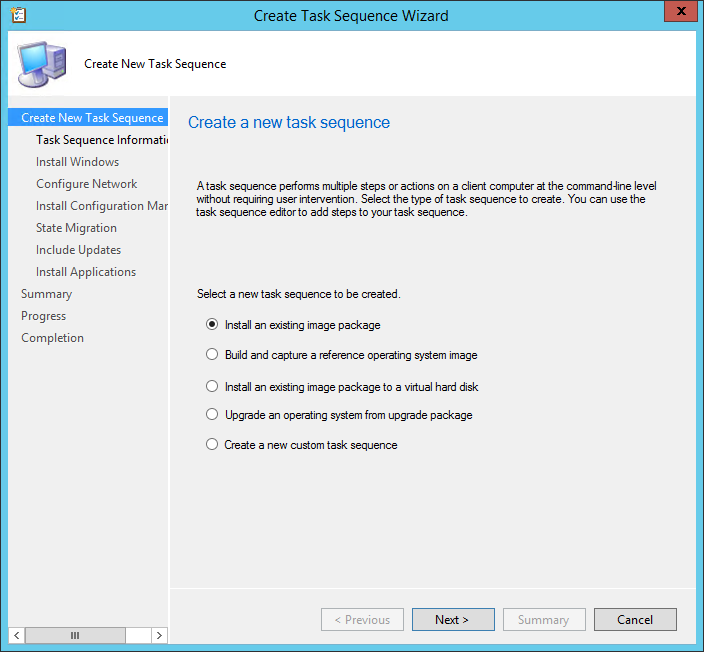
When you create a new task sequence from the latest SCCM version, the wizard takes care of the essential steps. Let’s create it and see what are the options :
- Go to Software Library \ Operating Systems \ Task Sequences
- Right-click Task Sequence and select Create Task Sequence
- Select Install an existing image package
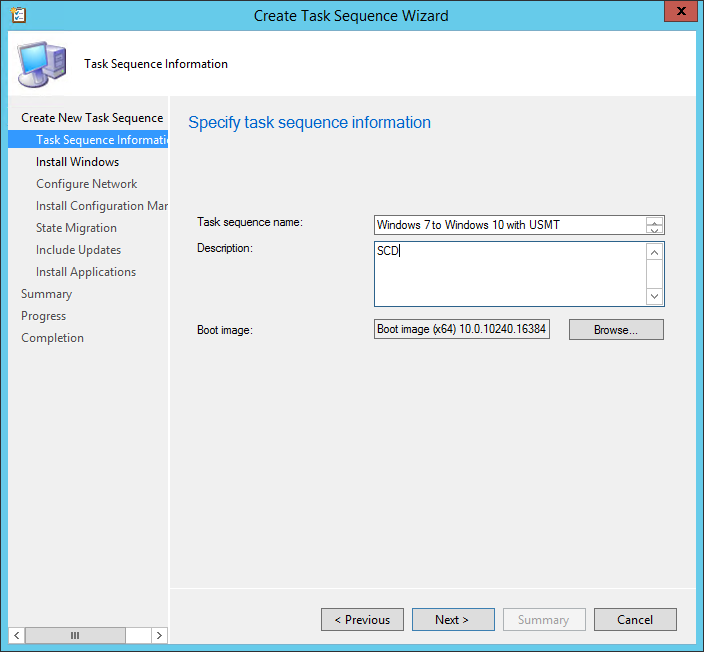
- On the Task Sequence Information tab, enter your Task sequence name, Description and Boot Image
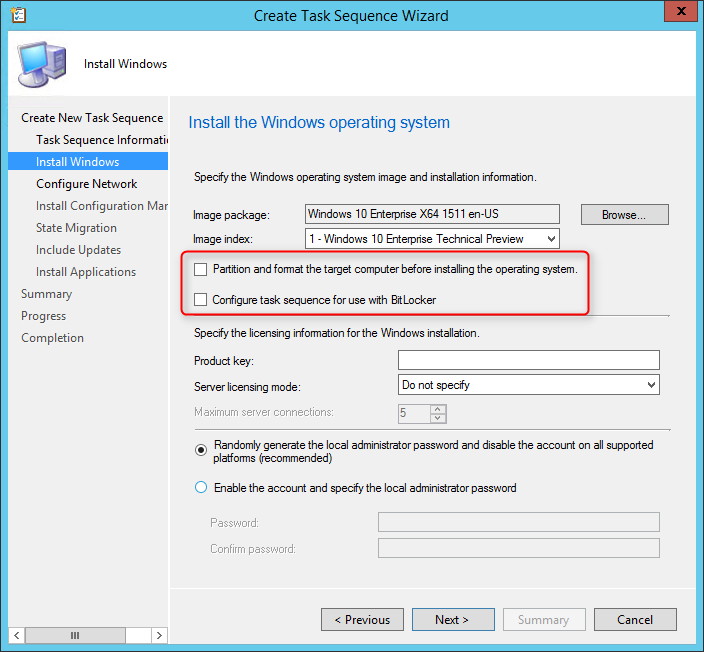
- On the Install Windows tab, uncheck Partition and format the target computer and Configure task sequence for use with Bitlocker
- If a format and partition of the disk is selected, it would wipe all data on the drive, including the USMT data. Instead, the Apply Operating System task will delete of all files and directories occurs on the drive minus protected USMT folders
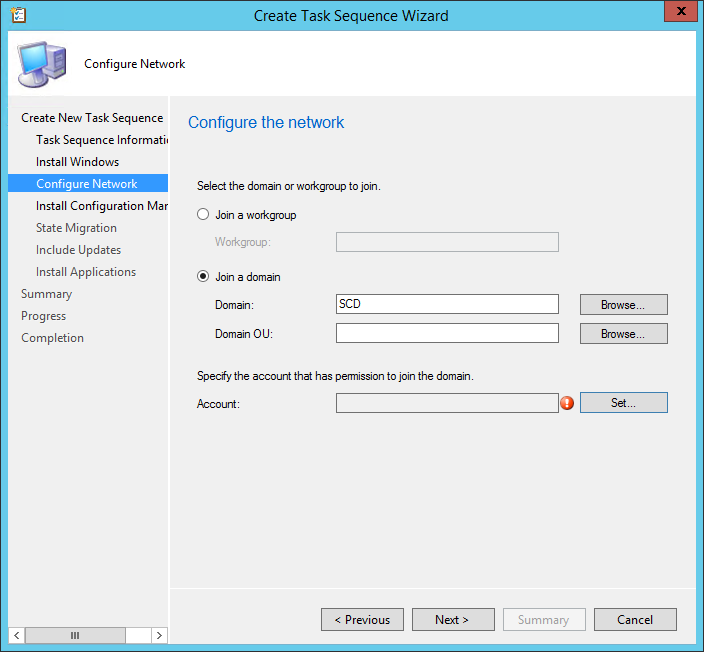
- On the Configure Network tab, select to join your domain and specify the account to use
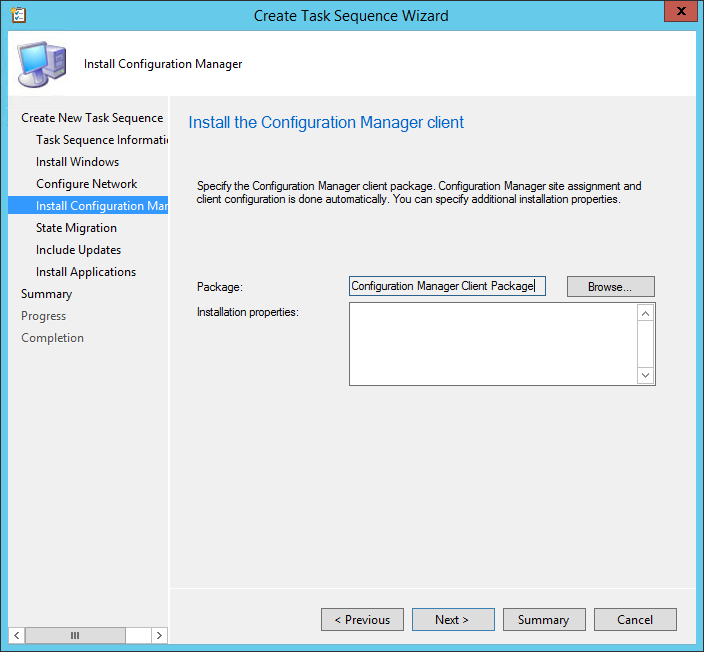
- On the Install Configuration Manager Client tab, select your client package
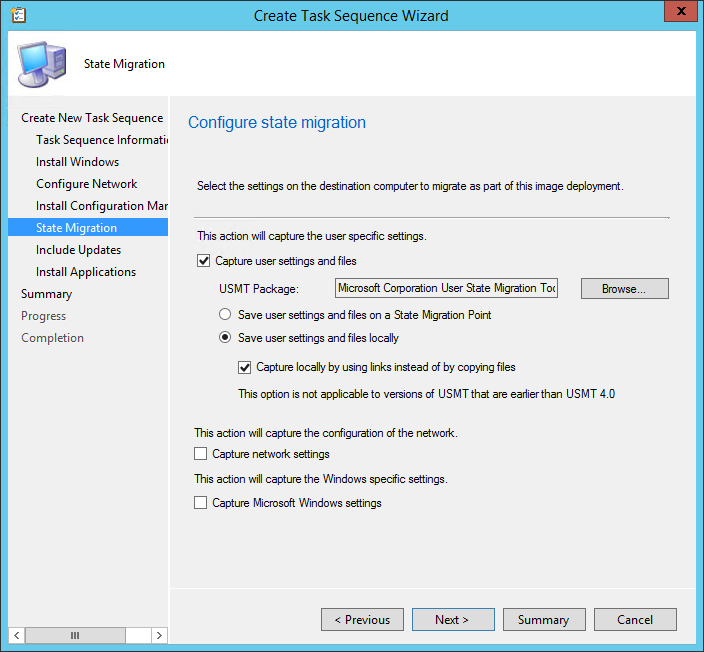
- On the State Migration tab, check Capture user settings and files, select your USMT Package
- Select Save user settings and files locally and check Capture locally by using links instead of by copying files
[su_note note_color=”#e56e6e” radius=”8″]This is the important part of the post[/su_note]
- If needed check the Capture Network Settings and Capture Windows Settings. See the attached links for more information about these options
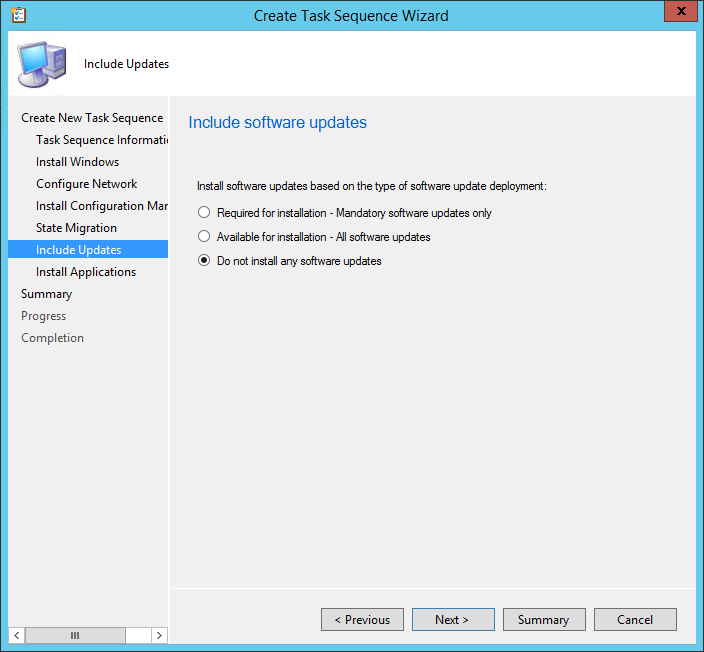
- In the Include Update tab, select the desired update behavior
- On the Install Applications tab, select any applications that you want to include in your task sequence
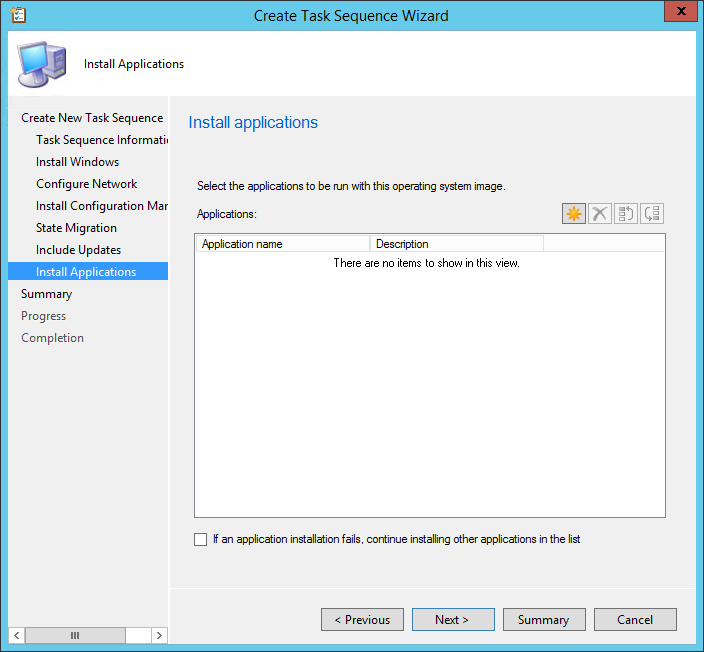
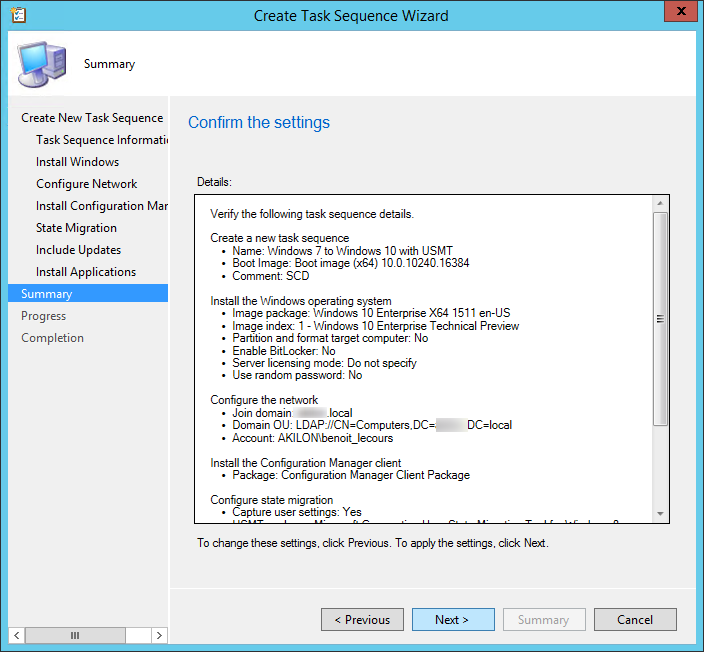
- On the Summary tab, review your choices, click Next and complete the wizard
- Now that the task sequence is created, we’ll edit it and review the steps
- Right-click your newly created task sequence and click Edit
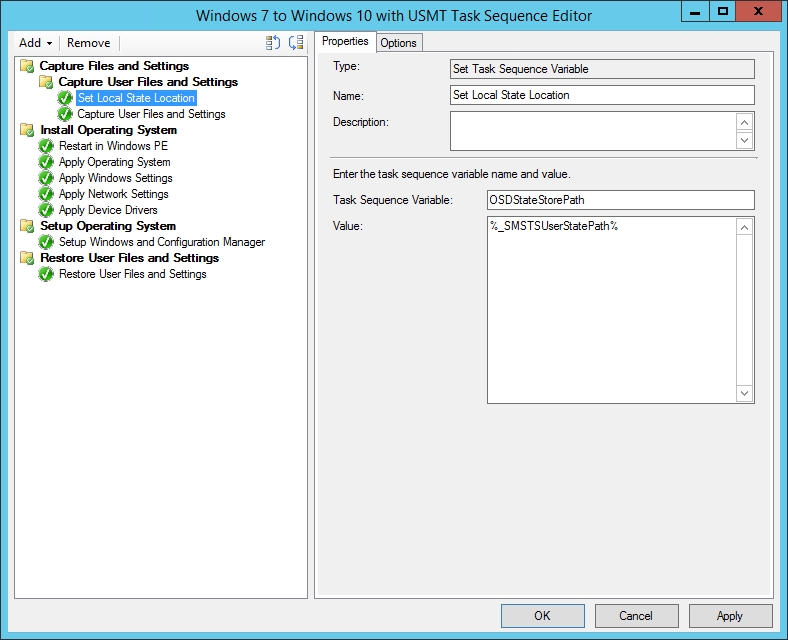
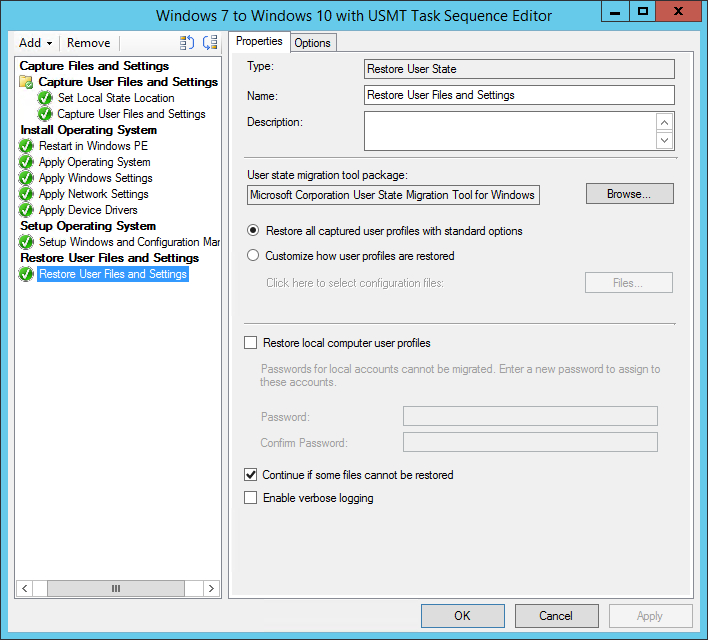
- You’ll notice 3 USMT steps has been created :
- Set Local State Location : This step specify the directory where the local state will be saved. We are using the builtin variable OSDStateStorePath and set the value to %_SMSTSUserStatePath% but you can use a specific location if needed
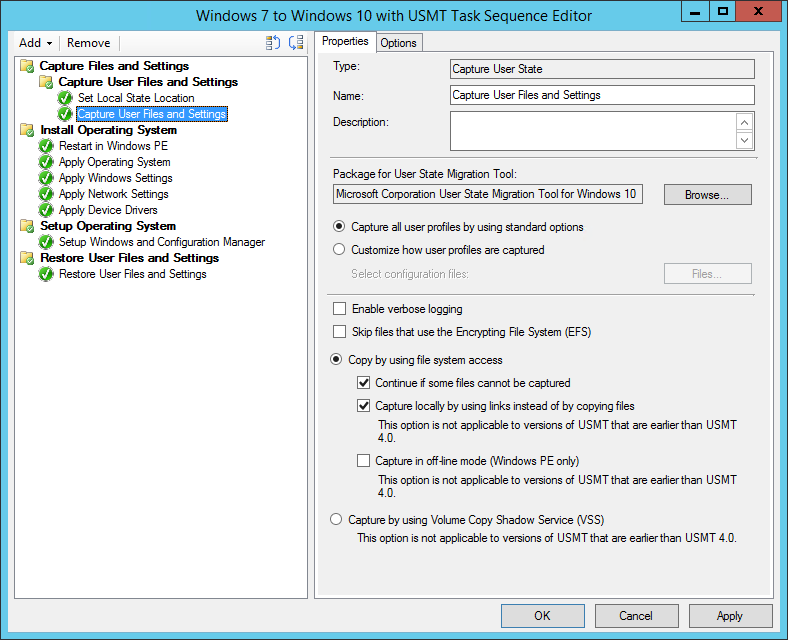
- Capture User Files and Settings : This is the step when USMT will run the ScanState command. You will see this command in SMSTS.log when monitoring your task sequence. (By default : C:\_SMSTaskSequence\Packages\<YourPackageID>\amd64\scanstate.exe C:\_SMSTaskSequence\UserState /o /localonly /efs:copyraw /c /hardlink /nocompress /l:C:\Windows\CCM\Logs\SMSTSLog\scanstate.log /progress:C:\Windows\CCM\Logs\SMSTSLog\scanstateprogress.log /i:C:\_SMSTaskSequence\Packages\<ID>\amd64\migdocs.xml /i:C:\_SMSTaskSequence\Packages\<ID>\amd64\migapp.xml)
- Restore User Files and Settings : This is the step when USMT will run the LoadState command. You will see this command in SMSTS.log when monitoring your task sequence (By default : C:\_SMSTaskSequence\Packages\<YourPackageID>\amd64\loadstate.exe C:\_SMSTaskSequence\UserState /ue:<computername>\* /c /hardlink /nocompress /l:C:\WINDOWS\CCM\Logs\SMSTSLog\loadstate.log /progress:C:\WINDOWS\CCM\Logs\SMSTSLog\loadstateprogress.log /i:C:\_SMSTaskSequence\Packages\<ID>\amd64\migdocs.xml /i:C:\_SMSTaskSequence\Packages\<ID>\amd64\migapp.xml)
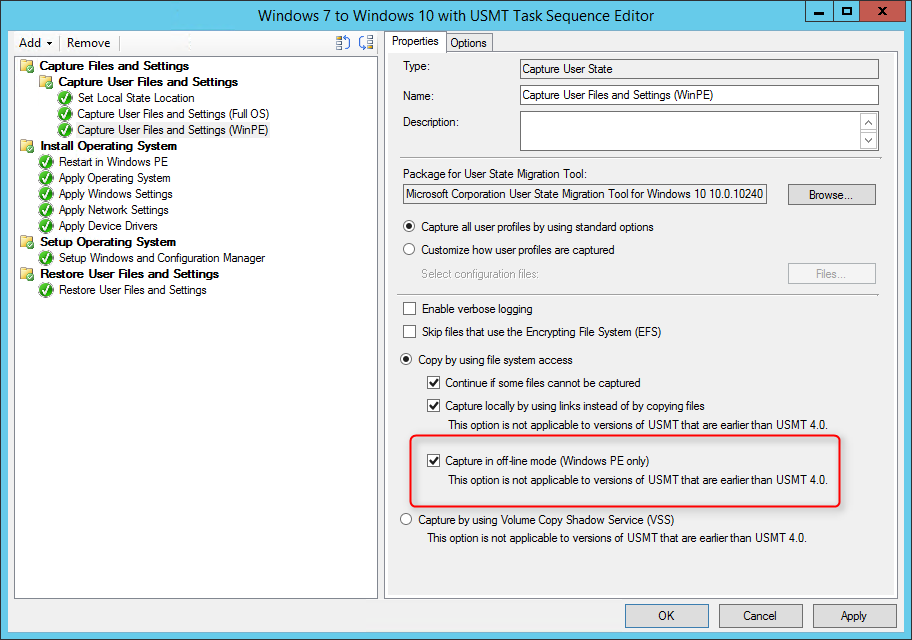
Add Support for WinPE
Now that we created a basic task sequence for USMT, we suggest to add a step to support offline capture. If you start your task sequence from PXE, you will need this new step because the step we just created will fail in Windows PE. We will add a step and condition to run depending of the environment in which the task sequence is ran.
- Right-click the task sequence you just created, select Edit
- Select the Capture User Files and Settings step
- Duplicate the task by doing CTRL-C, CTRL-V
- A new Capture User Files and Settings step is created, select the Capture in Off-line mode (Windows PE only) check box and rename the step to add (WinPE) at the end
- Rename the other Capture User Files and Settings step to (FullOS)
- You’ll end up with 2 similar Capture User Files and Settings step. One for Online mode (FullOS) and one for Offline mode (WinPE)

- Select the Capture User Files and Settings (Full OS) step and click on the Options tab
- Select Add Condition, Task Sequence Variable
- Variable : _SMSTSInWinPE
- Condition : Equals
- Value : False
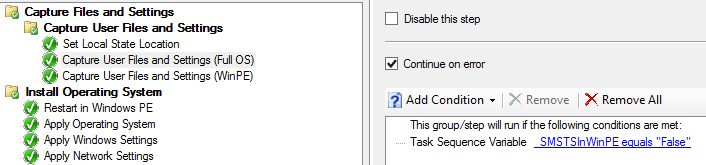
- Select the Capture User Files and Settings (WinPE) step and click on the Options tab
- Select Add Condition, Task Sequence Variable
- Variable : _SMSTSInWinPE
- Condition : Equals
- Value : True

- Click Apply and Ok to close the task sequence
Deploy SCCM Windows 10 USMT Task Sequence
We are now ready to deploy our Windows 10 USMT task sequence to the Windows 7 computer we want to upgrade.
- Go to Software Library \ Operating Systems \ Task Sequences
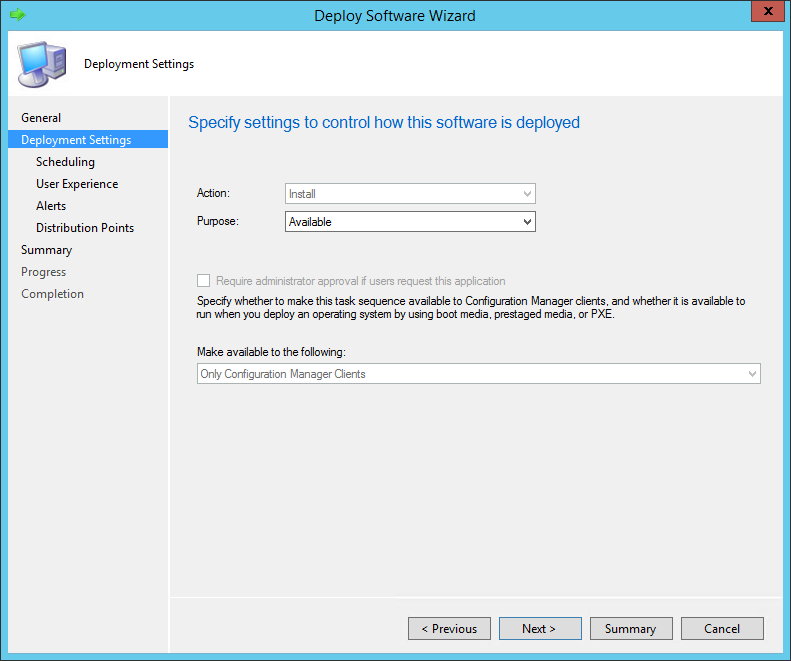
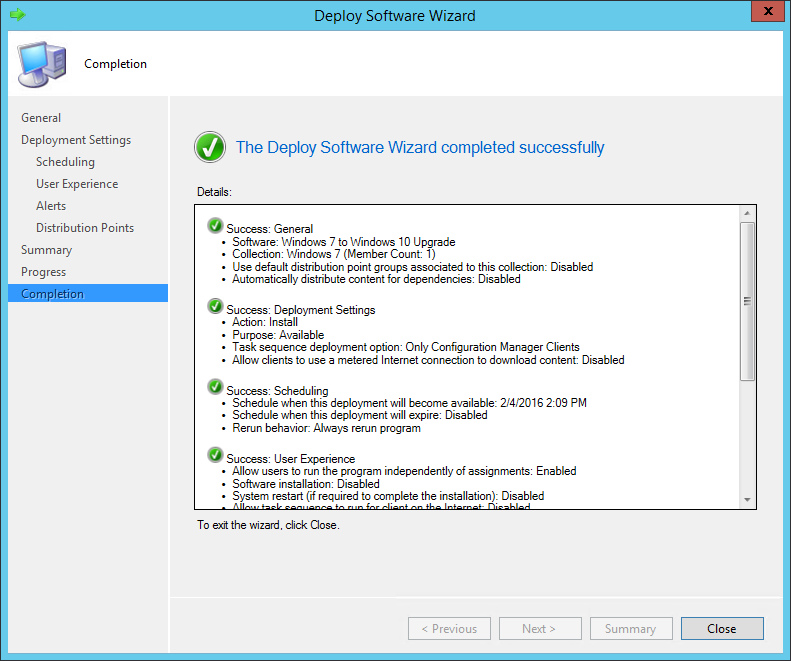
- Right-click your USMT Task Sequence and select Deploy
- On the General pane, select your collection. This is the collection that will receive the Windows 10 upgrade using USMT. For testing purposes, we recommend putting only 1 computer to start

- On the Deployment Settings tab, select the Purpose of the deployment
- Available will prompt the user to install at the desired time
- Required will force the deployment at the deadline (see Scheduling)
- You cannot change the Make available to the following drop-down since upgrade packages are available to client only
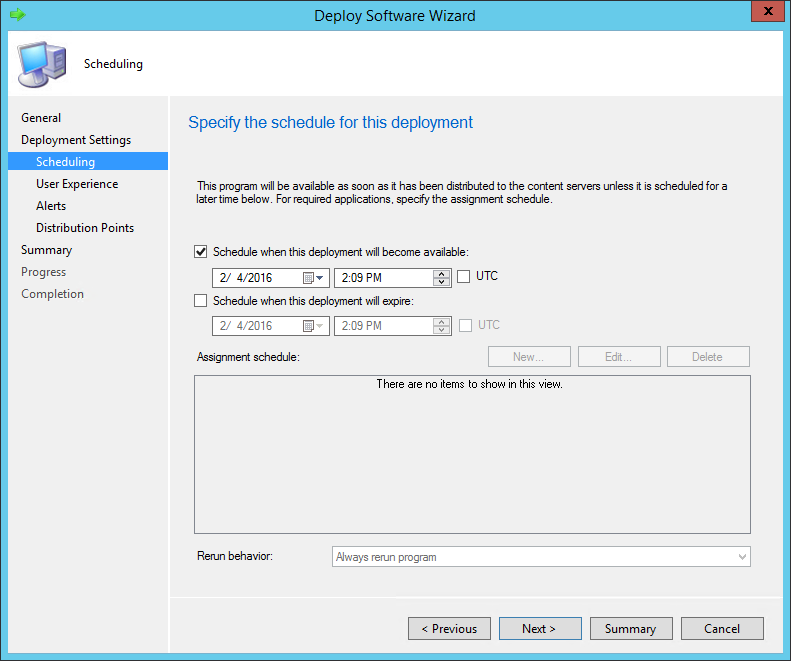
- On the Scheduling tab, enter the desired available date and time. On the screenshot, we can’t create an Assignment schedule because we select Available in the previous screen
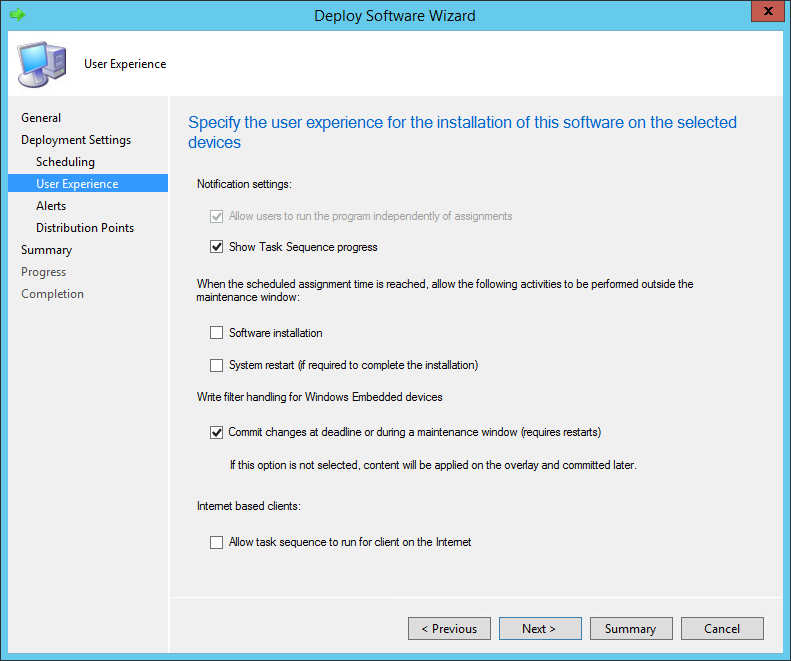
- In the User Experience pane, select the desired options
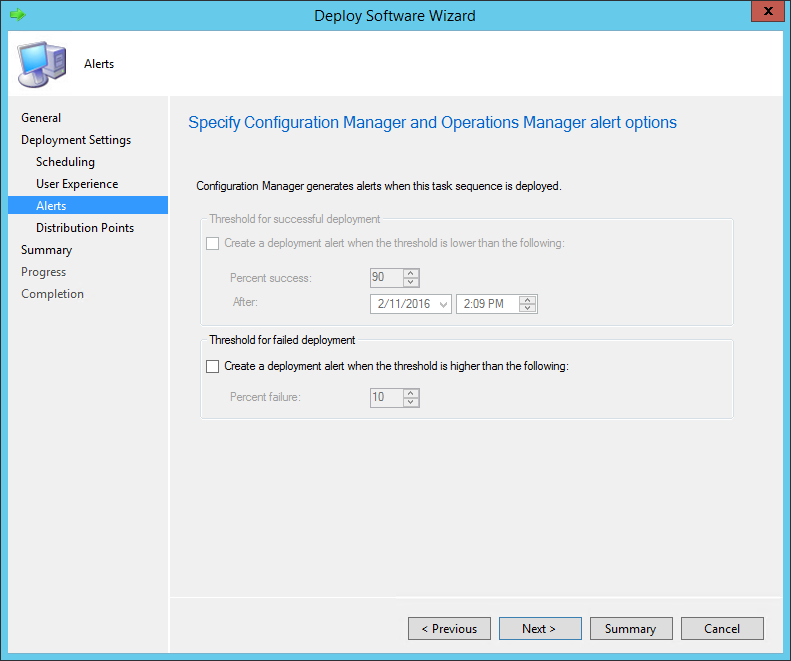
- In the Alerts tab, check Create a deployment alert when the threshold is higher than the following check-box if you want to create an alert on the failures
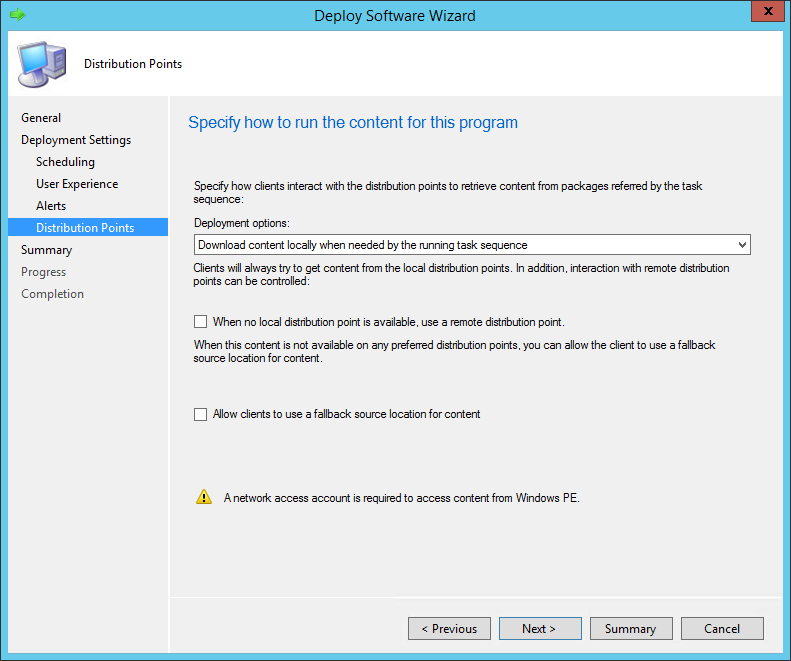
- On the Distribution Point pane, select the desired Deployment options. We will leave the default options
- Review the selected options and complete the wizard
Testing on the Target Computer
For the sake of this post we created a VM with Windows 7 32 bits. We will run our newly created task sequence to upgrade to Windows 10 64 bits.
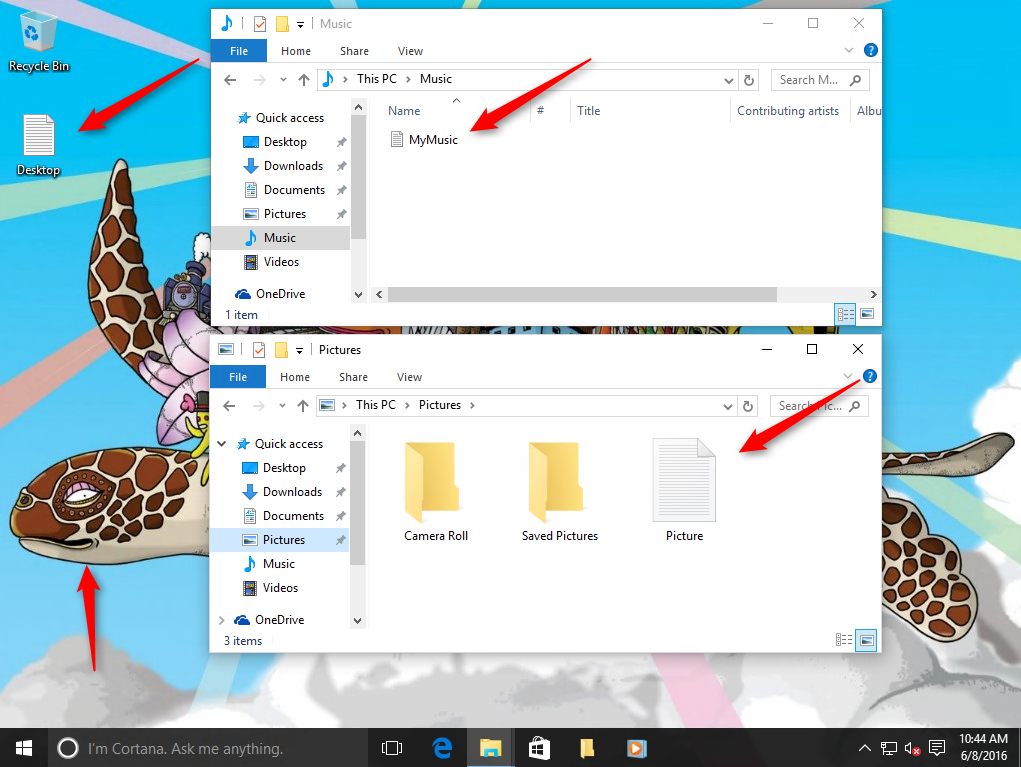
I also created multiple files in the user profile to shows the USMT actions. We simply created text documents in the various libraries and on the desktop.
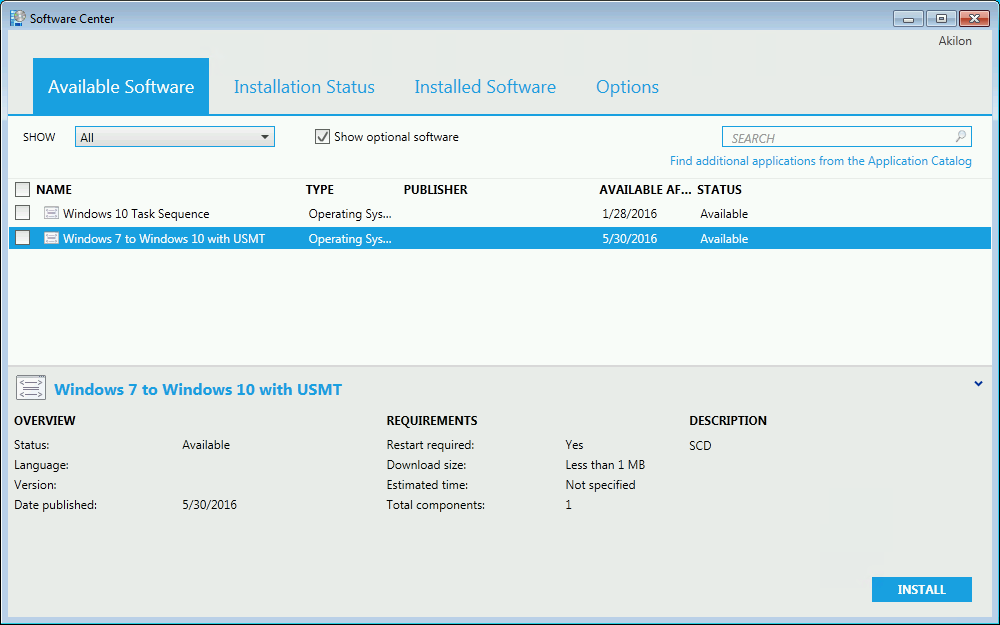
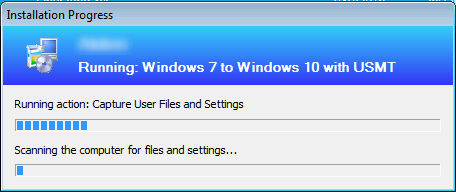
- We open the Software Center, select our task sequence and click Install
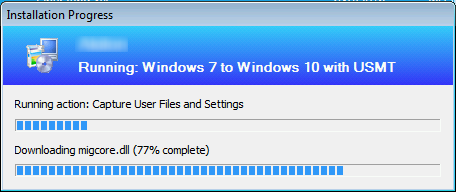
- The computer will launch the USMT action before rebooting in Windows PE and install Windows 10
- Once the process completed, we have a brand new Windows 10 migrated with my files where I left them. Even the psycho tortoise wallpaper has made the move.
We hope this post will ease your Windows 10 migrations. Leave a comment if you have any questions.
[ratings]
Share
Get the latest insights and exclusive content delivered to your inbox


Syed Ahmed
12.07.2016 AT 11:30 AMDaryl
09.22.2016 AT 01:46 PMDaniele
09.06.2016 AT 02:18 AM