

SCCM Windows 10 Inventory – Upgrade vs Fresh Install
Founder of System Center Dudes. Based in Montreal, Canada, Senior Microsoft SCCM Consultant, 8 times Enterprise Mobility MVP. Working in the industry since 1999. His specialization is designing, deploying and configuring SCCM, mass deployment of Windows operating systems, Office 365 and Intune deployments.

Benoit Lecours
PresidentTable of Content


Get the latest insights and exclusive content delivered to your inbox
Share


With the next Windows 10 release planned for October 17th, I’m actually working on migrating a bunch of Windows 10 devices. Some are Windows 10 v1511, some v1607. Some have been installed using a fresh image and some have been migrated from a previous version. I thought it would be a good idea to inventory those devices to know their installation source (fresh or upgraded).
To achieve this, we’ll need to extend our SCCM inventory to grab a custom registry key and then build a query or report to show this information. For this post, I’m using SCCM 1706 but the procedure is the same for SCCM 2012 or later.
Windows 10 Fresh vs Upgrade Inventory Information
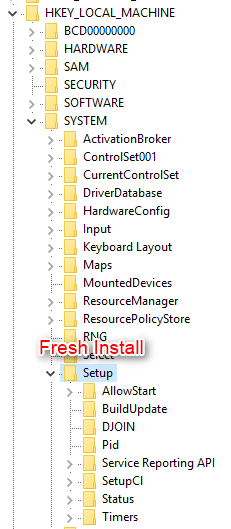
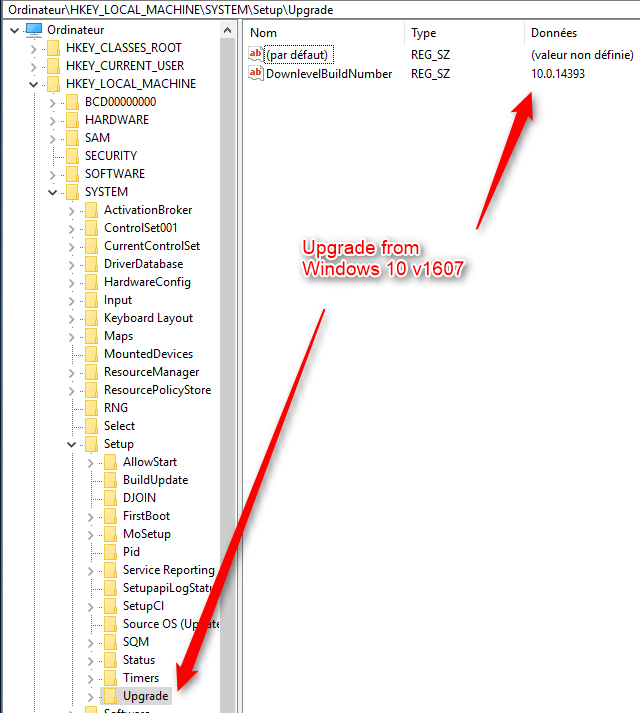
The Windows 10 Upgrade information is located in the device registry in the HKLM\System\Setup\upgrade\downlevelbuildnumber. We need to modify our hardware inventory to gather this value on our Windows 10 devices. I’ll guide you through this process if you’re not familiar with it.
- A Fresh Windows 10 installation will have this value (no Upgrade folder)
- An Upgraded Windows 10 from v1607 (10.0.1.14393) will have this value
SCCM Windows 10 Inventory Upgrade Fresh Extention
To extend SCCM Inventory, the high-level steps are :
- Generate MOF files for inventory and reporting
- Customize Configuration.mof file
- Modify Client Settings Hardware Inventory (Add classes)
To generate the MOF file, we are using the popular tool RegKeytoMof created by MVP Mark Cochrane.
- Download and run the tool
- Navigate to HKLM\System\Setup\Upgrade
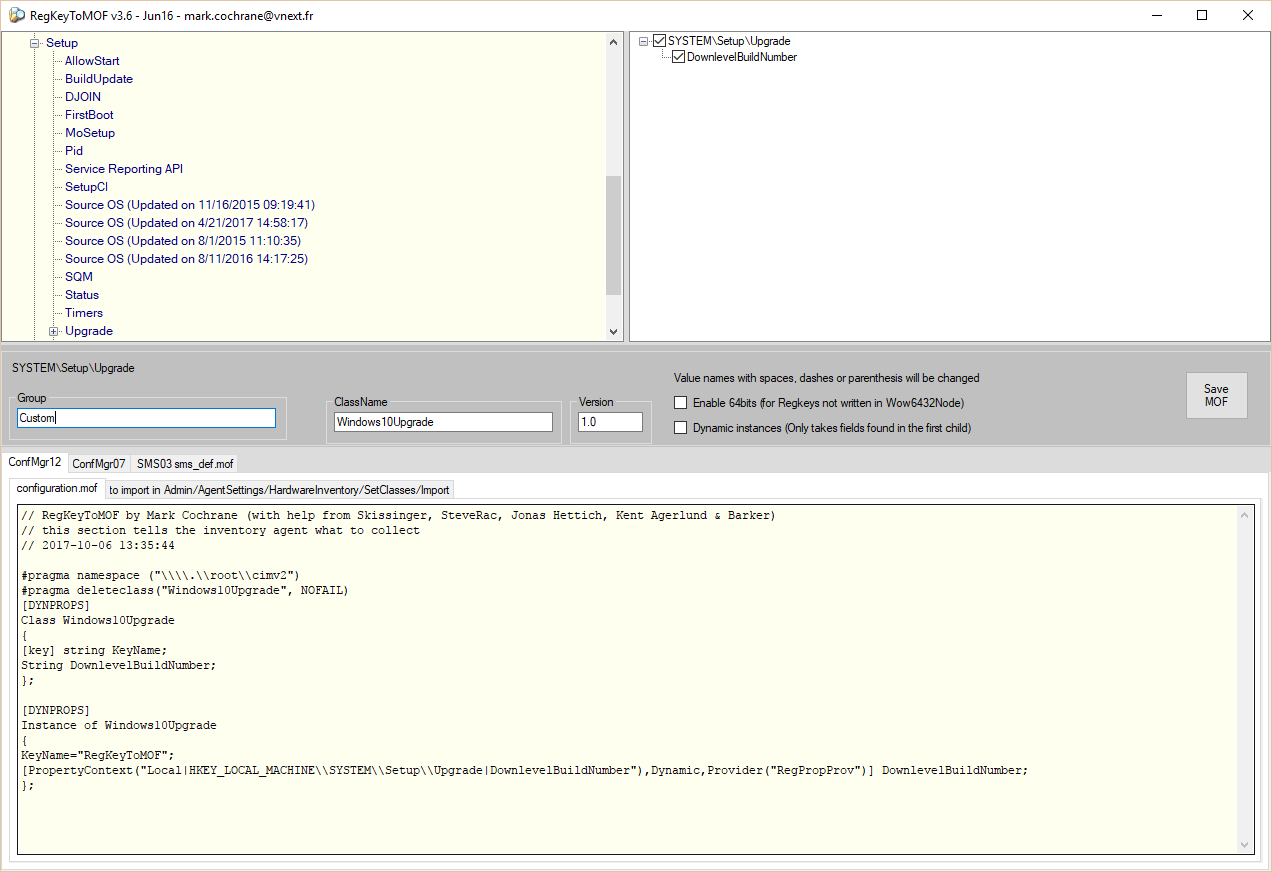
- Click on Save MOF on the right and save 2 CM12*.mof files on your SCCM server
- We recommend to backup your configuration.mof file before modifying it. Just copy and paste it to create a copy. The file is located in your site server SCCM installation directory (SCCMInstallationdir\inboxes\clifiles.src\hinv)
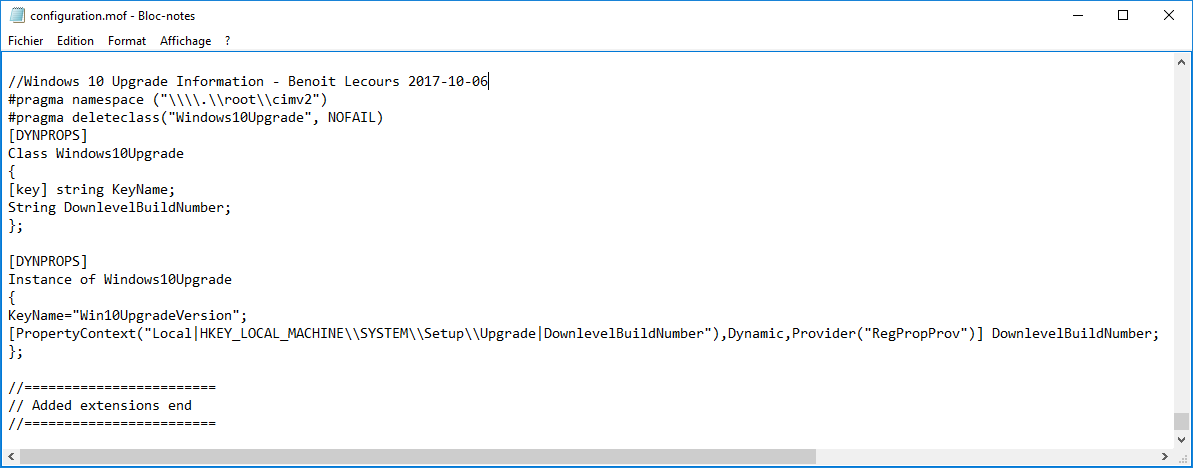
- Open the CM12Config.mof file generated by the RegKeytoMof toll using a text editor and copy/paste the whole text at the complete end of Configuration.MOF (between the
// Added extensions start and // Added extensions end section
[pastacode lang=”css” manual=”%2F%2F%3D%3D%3D%3D%3D%3D%3D%3D%3D%3D%3D%3D%3D%3D%3D%3D%3D%3D%3D%3D%3D%3D%3D%3D%0A%2F%2F%20Added%20extensions%20start%0A%2F%2F%3D%3D%3D%3D%3D%3D%3D%3D%3D%3D%3D%3D%3D%3D%3D%3D%3D%3D%3D%3D%3D%3D%3D%3D%0A%0A%3CMOF%20EXTENTION%20GOES%20HERE%3E%0A%0A%2F%2F%3D%3D%3D%3D%3D%3D%3D%3D%3D%3D%3D%3D%3D%3D%3D%3D%3D%3D%3D%3D%3D%3D%3D%3D%0A%2F%2F%20Added%20extensions%20end%0A%2F%2F%3D%3D%3D%3D%3D%3D%3D%3D%3D%3D%3D%3D%3D%3D%3D%3D%3D%3D%3D%3D%3D%3D%3D%3D” message=”” highlight=”” provider=”manual”/]
The code should look like this :
[pastacode lang=”css” manual=”%23pragma%20namespace%20(%22%5C%5C%5C%5C.%5C%5Croot%5C%5Ccimv2%22)%0A%23pragma%20deleteclass(%22Windows10Upgrade%22%2C%20NOFAIL)%0A%5BDYNPROPS%5D%0AClass%20Windows10Upgrade%0A%7B%0A%5Bkey%5D%20string%20KeyName%3B%0AString%20DownlevelBuildNumber%3B%0A%7D%3B%0A%0A%5BDYNPROPS%5D%0AInstance%20of%20Windows10Upgrade%0A%7B%0AKeyName%3D%22Win10UpgradeVersion%22%3B%0A%5BPropertyContext(%22Local%7CHKEY_LOCAL_MACHINE%5C%5CSYSTEM%5C%5CSetup%5C%5CUpgrade%7CDownlevelBuildNumber%22)%2CDynamic%2CProvider(%22RegPropProv%22)%5D%20DownlevelBuildNumber%3B%0A%7D%3B” message=”” highlight=”” provider=”manual”/]
- Save the file and look at the modification date. The SCCM server will automatically compile the file. If there’s an error, the file will be reverted to the previous version.
- Final file :
- If the file compiles without error, close your text editor and proceed to next step
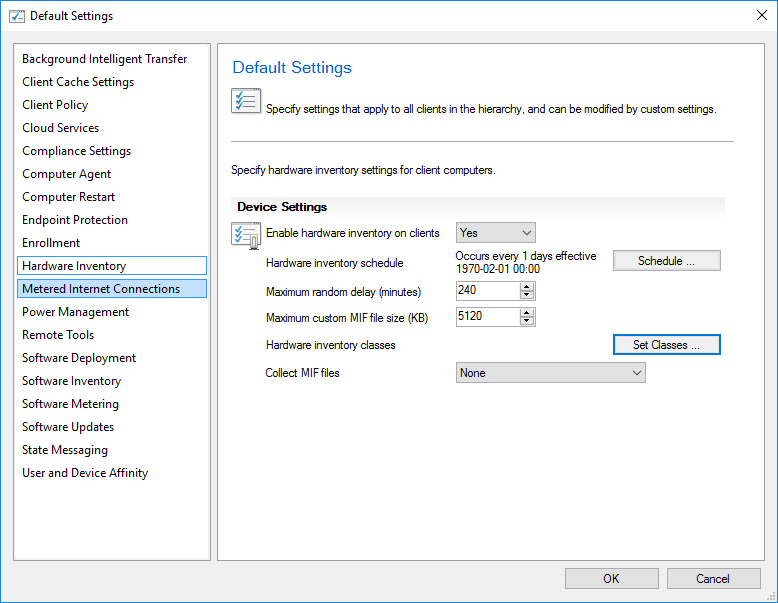
- Open the SCCM Console
- Go to Administration \ Client Settings, select your Default Client Settings
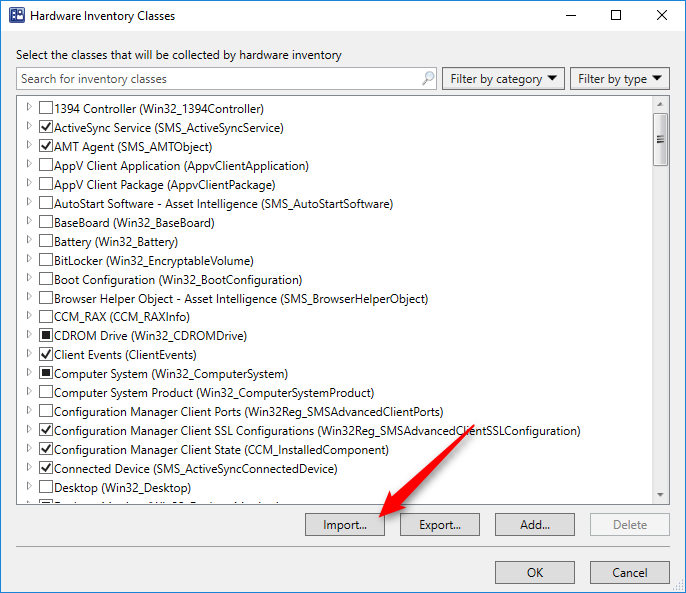
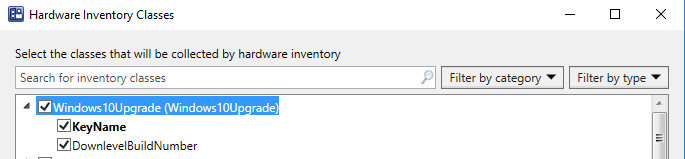
- Go to Hardware Inventory and click Set Classes
- Click on Import
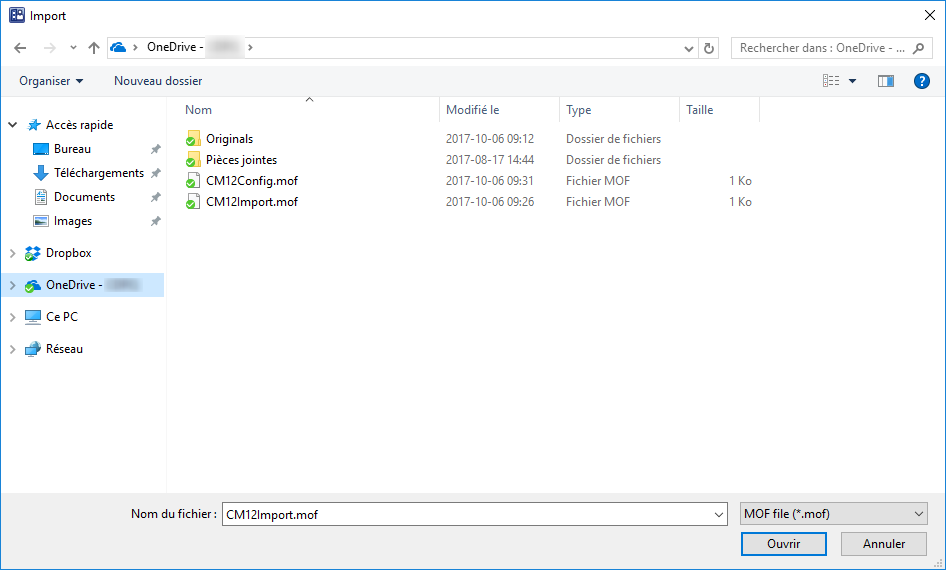
- Select your CM12Import.mof file that was generated by the RegKeytoMof tool, click Open
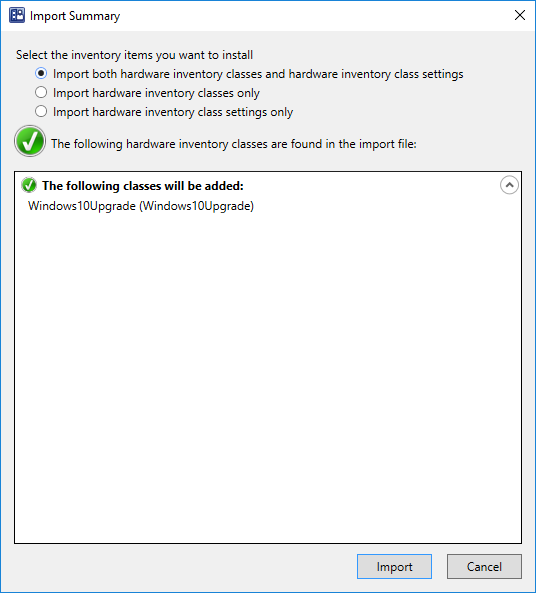
- Select the default option and click Import
- The Class is ready to be enabled. We suggest that you disable it from your Default Client Settings and that you create a new client setting for testing purpose. Enable the class in the new client setting and deploy it to a test collection
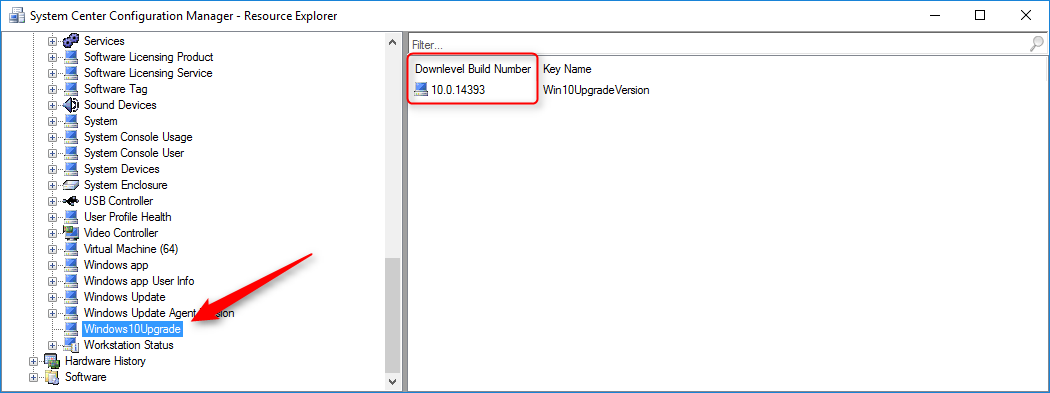
- Initiate a Machine policy retrieval & evaluation cycle and a Hardware Inventory on a client from the test collection
- Wait for the inventory process to complete and confirm that the information has been inventoried by using Ressource Explorer
- Once confirmed, extend your client setting to all your Windows 10 clients.
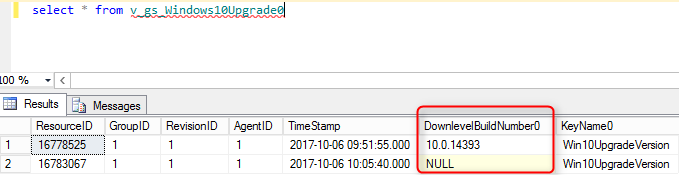
- In SQL, you’ll see the information in the V_GS_Windows10Upgrade0 view. (It should match your ClassName in RegKeyToMof)
[pastacode lang=”sql” manual=”select%20*%20from%20V_GS_Windows10Upgrade0″ message=”” highlight=”” provider=”manual”/]
- I will try to add this information in our Windows 10 inventory Report in the following days.

Share
Get the latest insights and exclusive content delivered to your inbox


Bill
05.10.2018 AT 12:31 PM