
SCCM SQL 2017 Install Guide
Contributor of System Center Dudes. Based in Montreal, Canada, Senior Microsoft SCCM consultant, working in the industry for more than 10 years. He developed a strong knowledge of SCCM and MDT to build automated OS deployment solution for clients, managed large and complexe environment, including Point of Sale (POS) related projects.

Jonathan Lefebvre
Table of Content


Share


Get the latest insights and exclusive content delivered to your inbox
The PDF file is a 162 pages document that contains all informations to install and configure SCCM Current Branch. Use our products page or use the button below to download it . size> |
In the first part of this SCCM Current Branch blog series, we planned our hierarchy, prepared our Server and Active Directory.
In part 2, We will go through the complete SCCM SQL 2017 Install Guide to install and configure SQL before installing SCCM Current Branch 1806 or higher.
This post is our updated version of our SQL install guide for version 2017 and higher. If you are planning on installing an older version of SQL, please follow our previous post here
Click the following link to see all supported SQL versions. For our post, we will install SQL 2017 locally on the same server where the Primary Site will be installed.
SCCM SQL 2017 Install Guide
- Execute Setup.exe from the SQL installation media, select New SQL server stand-alone installation
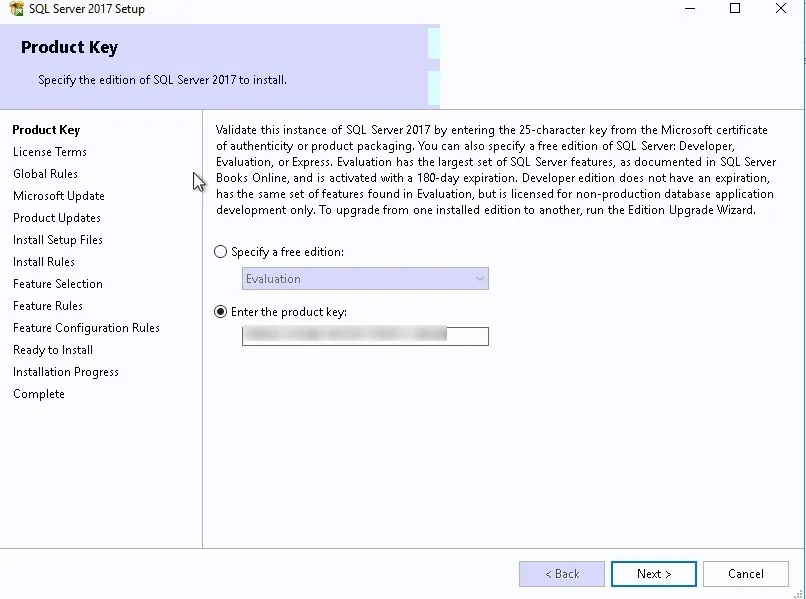
- Provide the product key and click Next
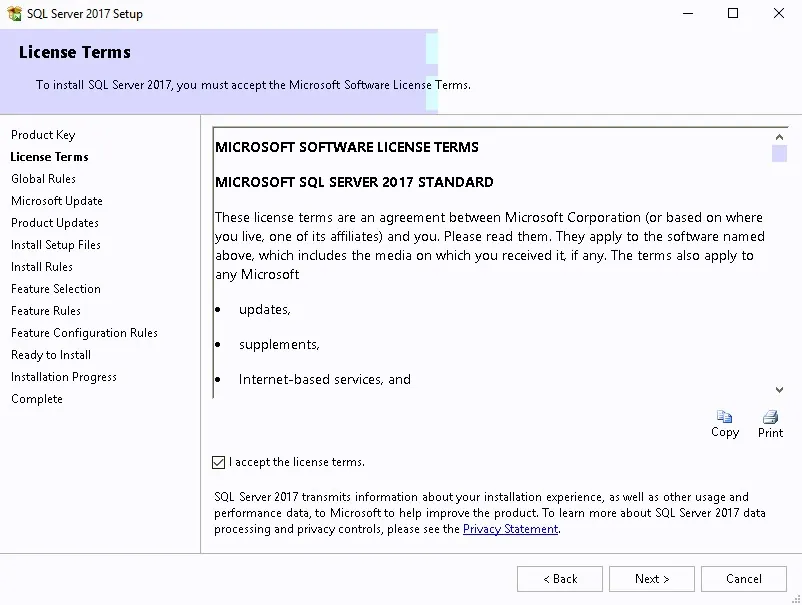
- Review and Click Next
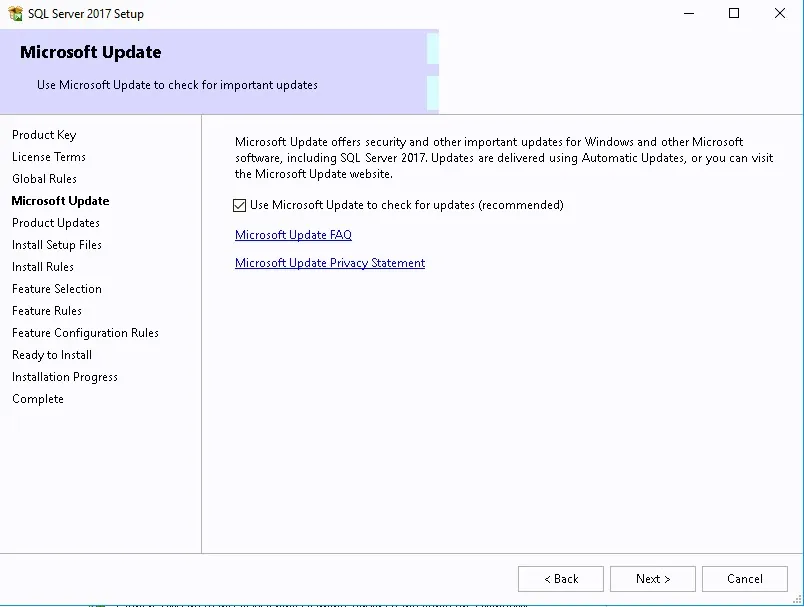
- Check Use Microsoft Update to check for updates and click Next
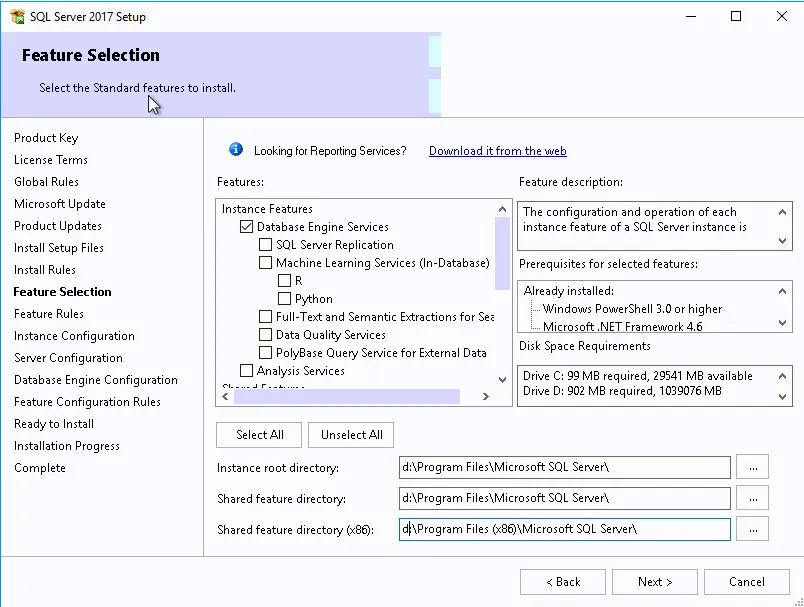
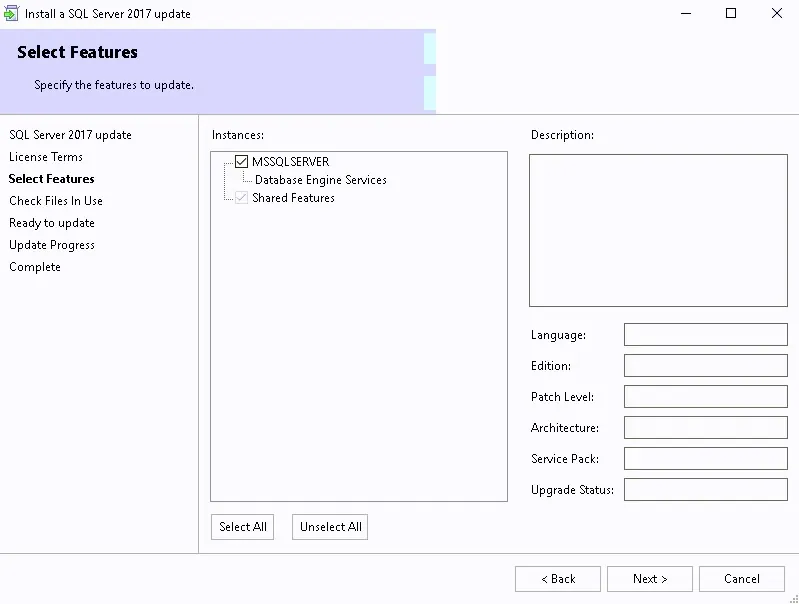
- Select SQL Server Feature Installation
Note that some steps in the wizard are automatically skipped when no action is required. For example, Products Updates, Install setup Files and Install Rules might be skipped.
- Select the Database Engine feature and specify the SQL installation directory. This is the directory for the program files and shared features
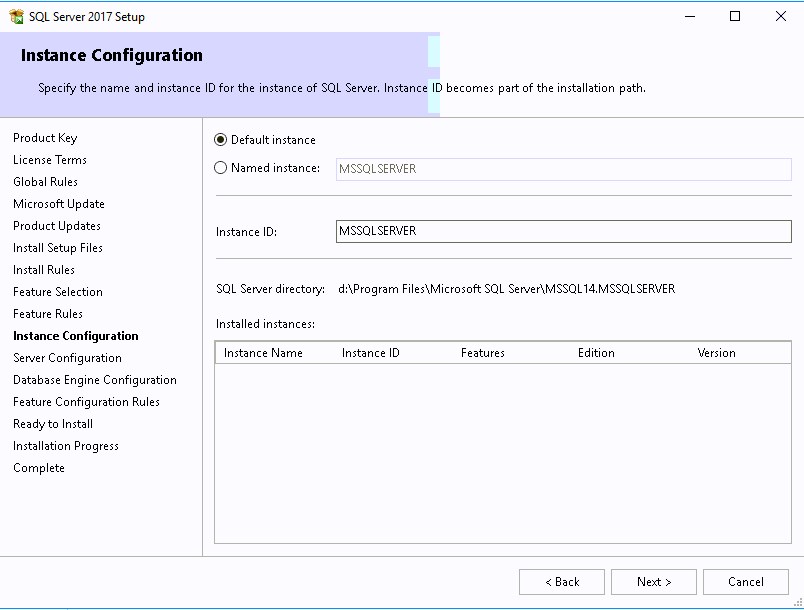
- Select Default instance and ensure that your instance is created on the SQL Volume
- Set all services to run as the SQL domain account that you created previously and set the services startup type to Automatic
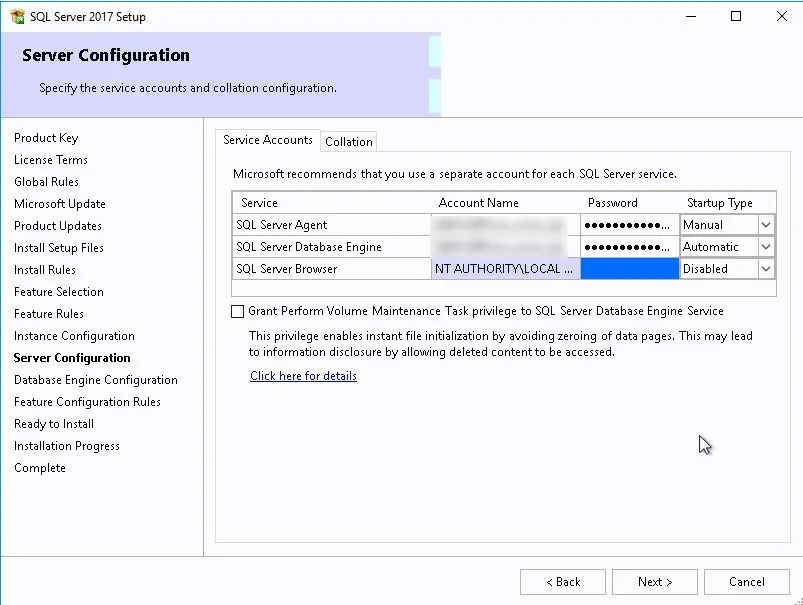
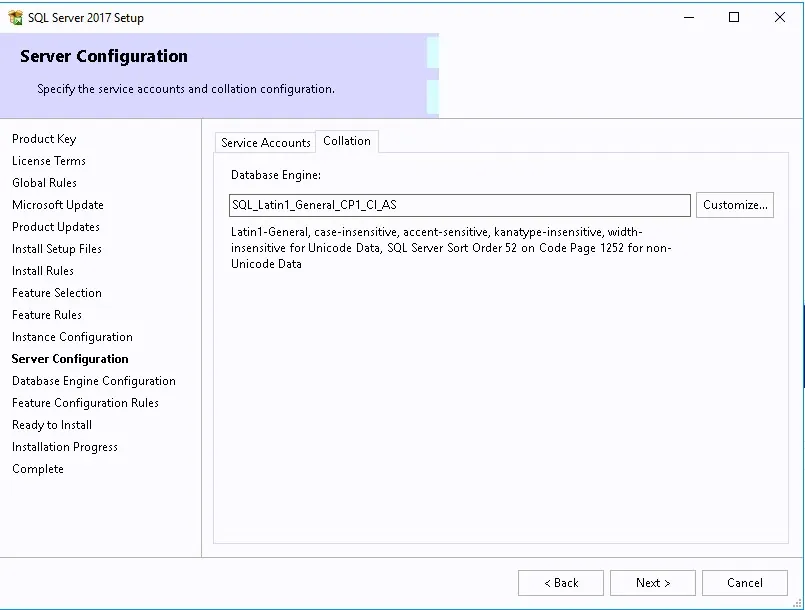
- On the Collation tab, set the Database Engine to use SQL_Latin1_General_CP1_CI_AS
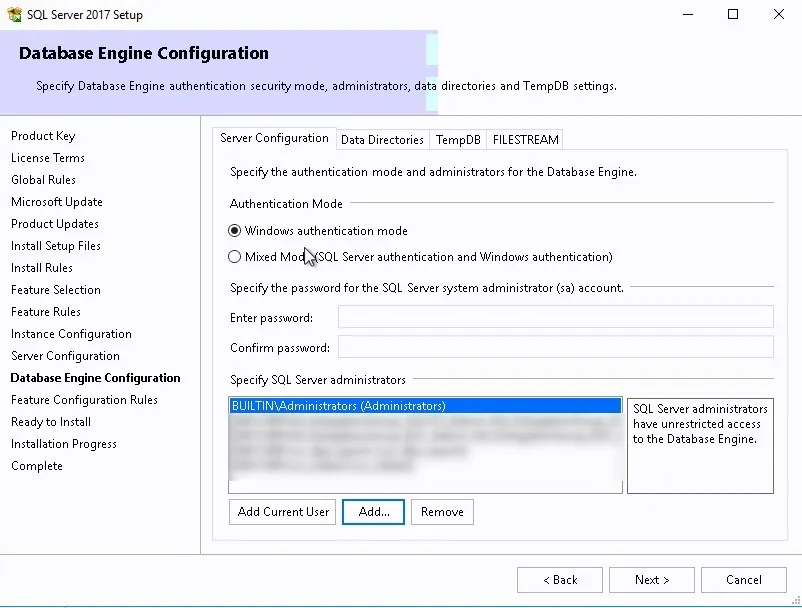
- In the Server Configuration tab, set the authentication mode to Windows Authentication and in the SQL Server Administrators add your SCCM Admins group
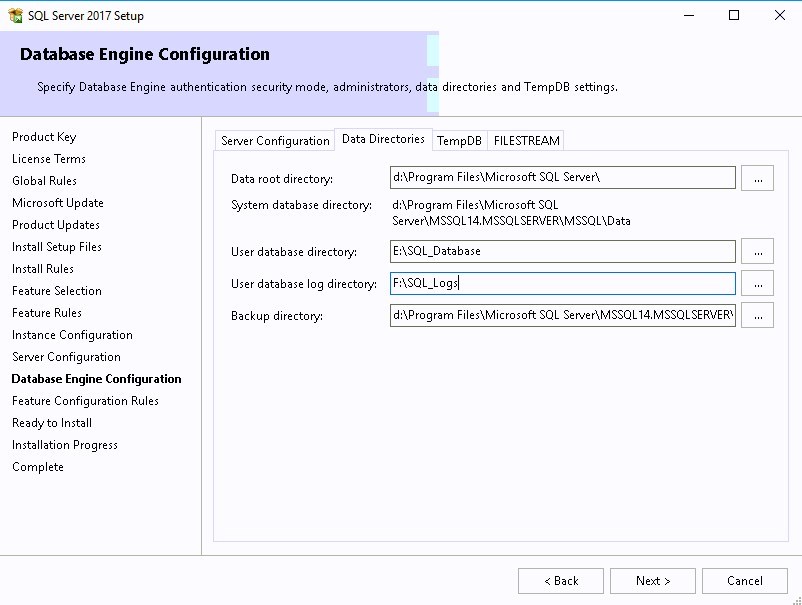
- In the Data Directories tab set your drive letters correctly for your SQL databases, Logs, TempDB, and backup
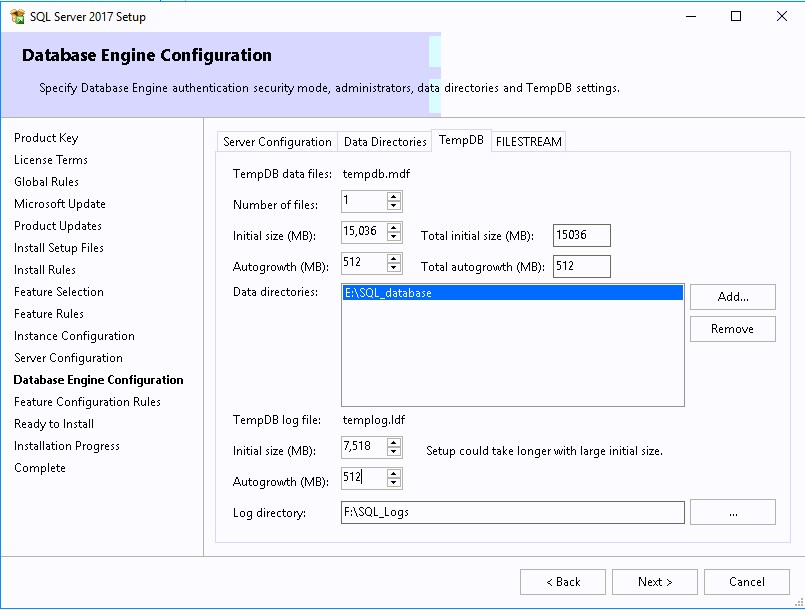
- On the TempDB, complete the various information based on the Database sizing section below.
- Click Install
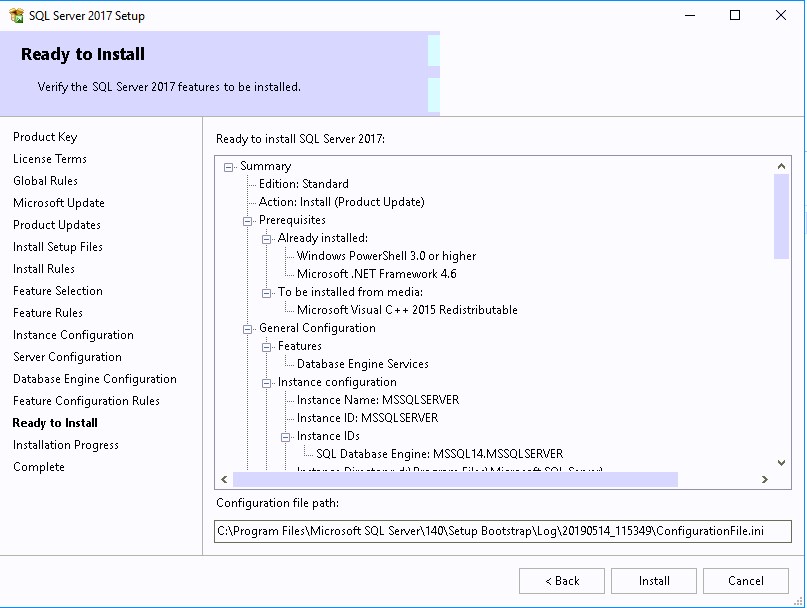
- Complete the installation by clicking Close
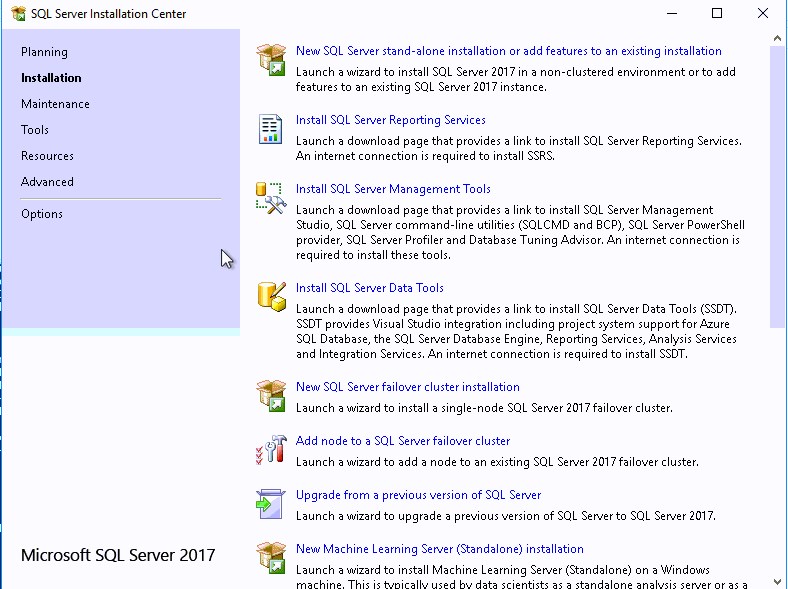
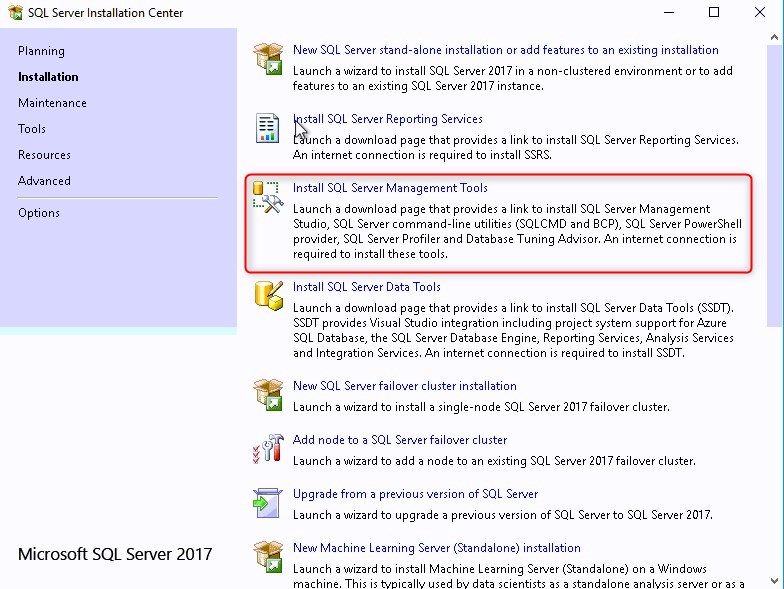
Install SQL Server Management Studio (SSMS)
- Back in the SQL Server Installation Center, click on Install SQL Server Management tools.
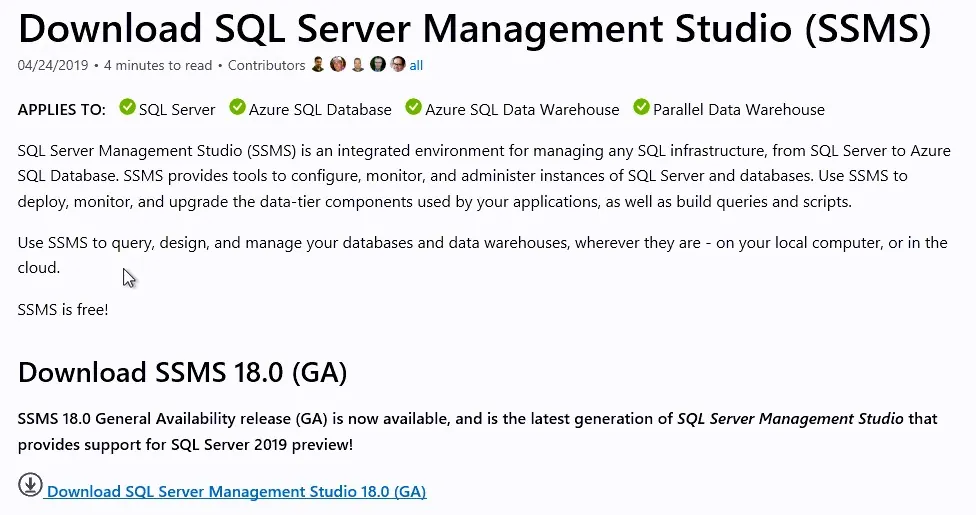
- This will redirect you to the Download page of SQL Server Management Studio. SSMS is no longer tied to the SQL server installation in terms of version.
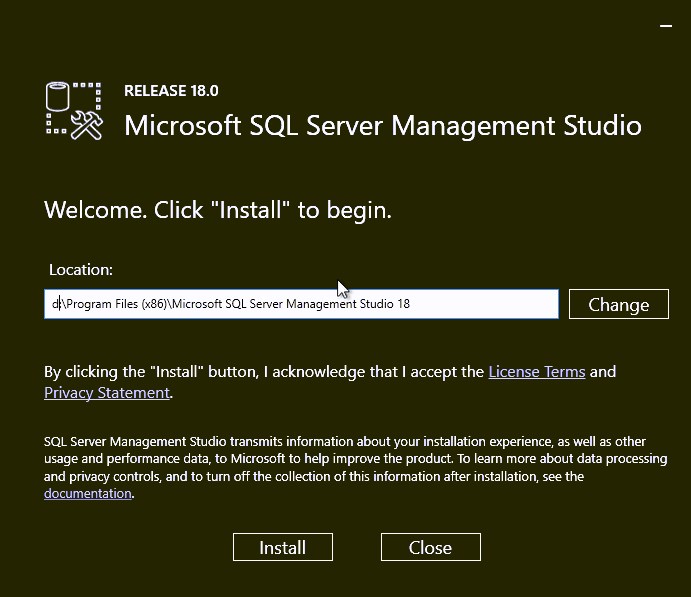
- Adjust the installation path if need, then click Install
Install SQL Reporting Services
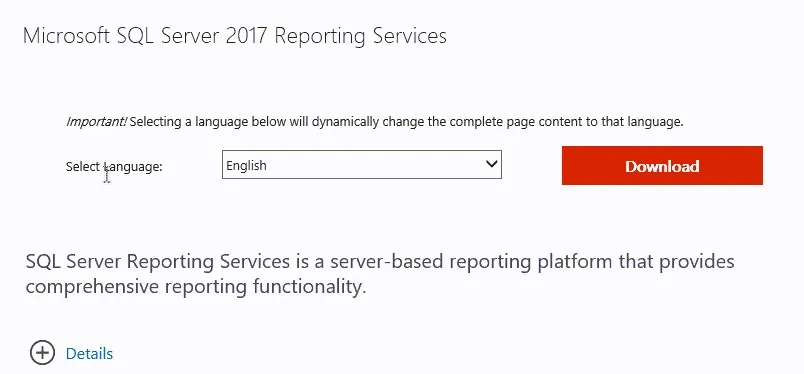
- Back in the SQL Server Installation Center, click on Install SQL Reporting Services.
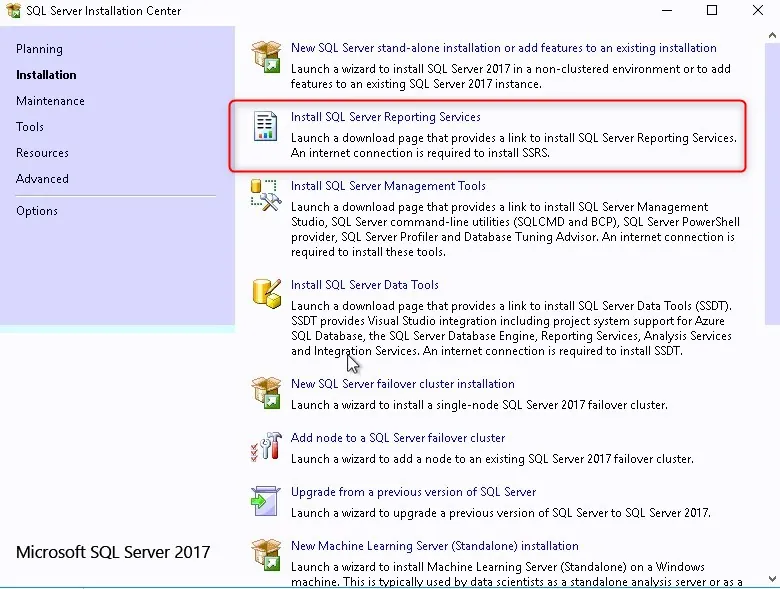
- The SQL reporting services is just like the Management console, it requires a separate download
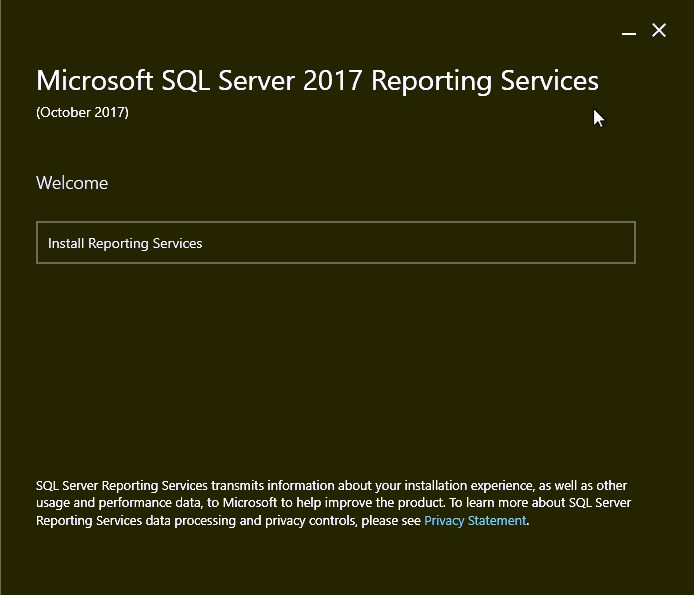
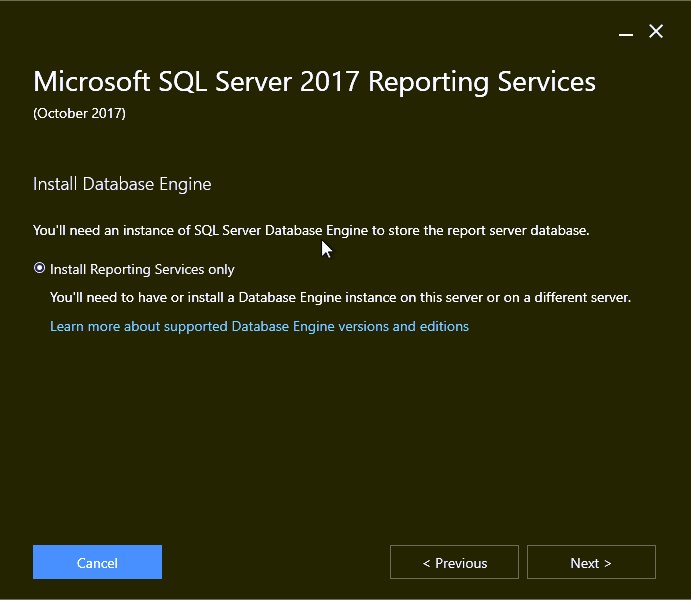
- Click on Install Reporting Services
- Provide the Product key
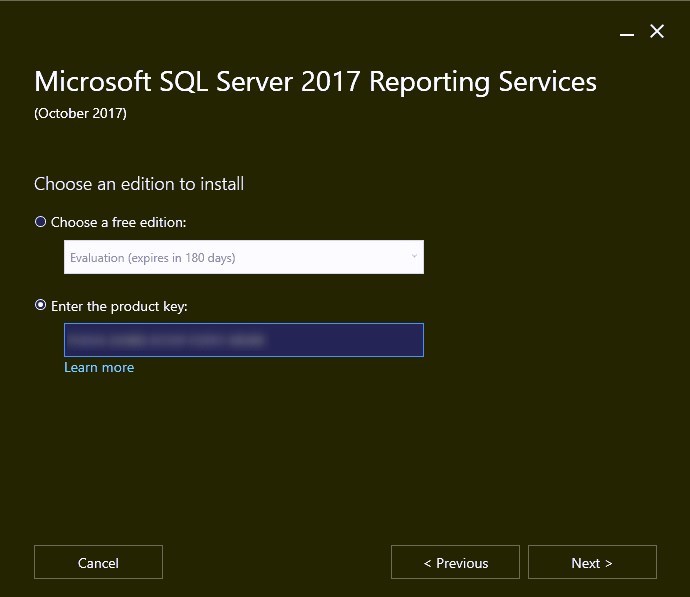
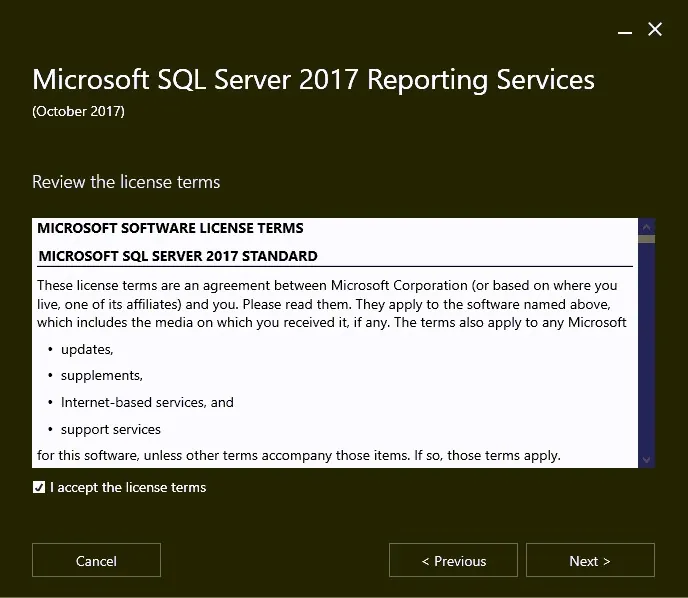
- Accept License terms
- Click Next
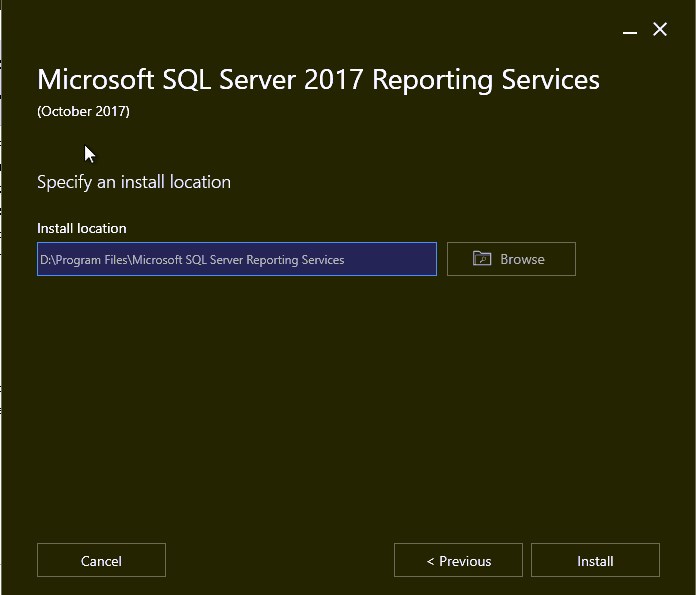
- Select the installation path, click Install
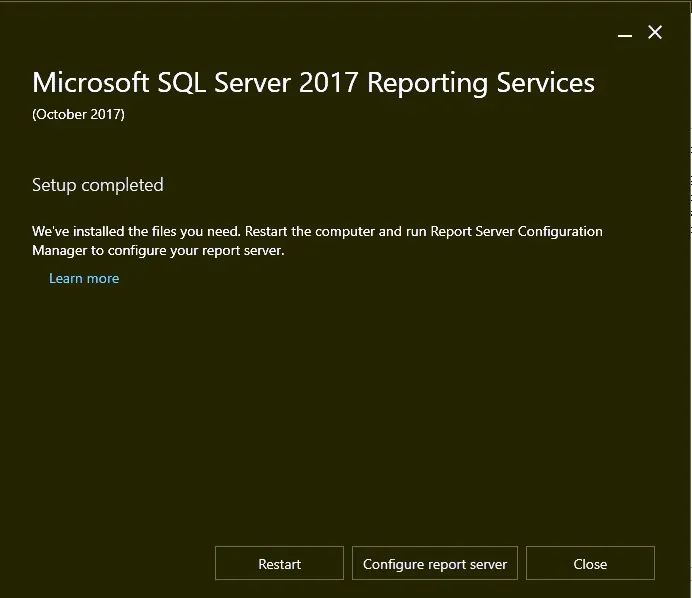
- A reboot is required after the installation
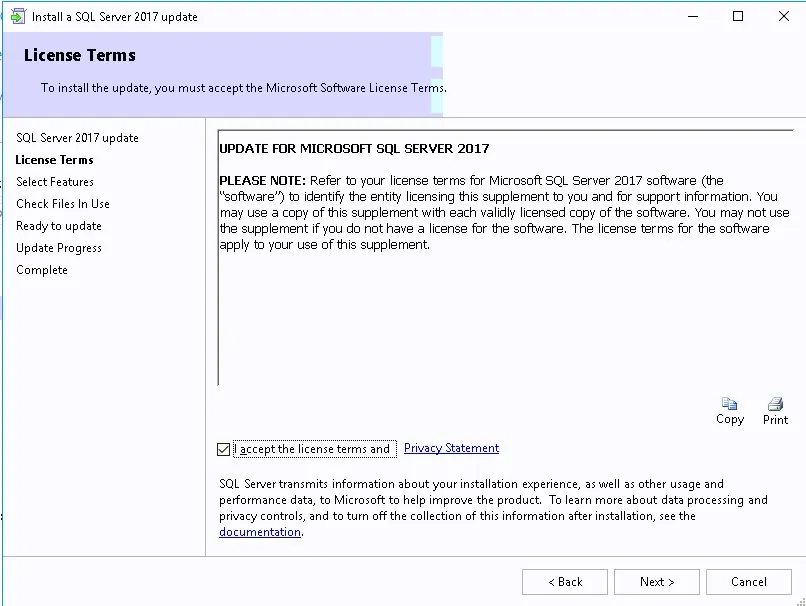
Apply SQL 2017 CU2 or higher
At the time of this writing, the latest SQL Cumulative Update is CU17. We will install it in order to have an updated SQL Installation. Note that CU2 is the minimum requirement
- Download and execute SQL 2017 CU17
- Accept the license terms and click Next
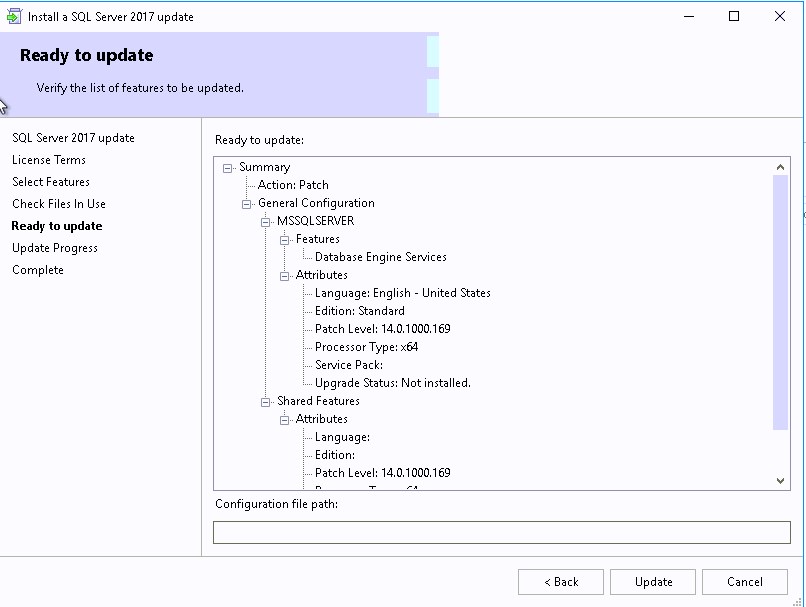
- Leave default values, click Next
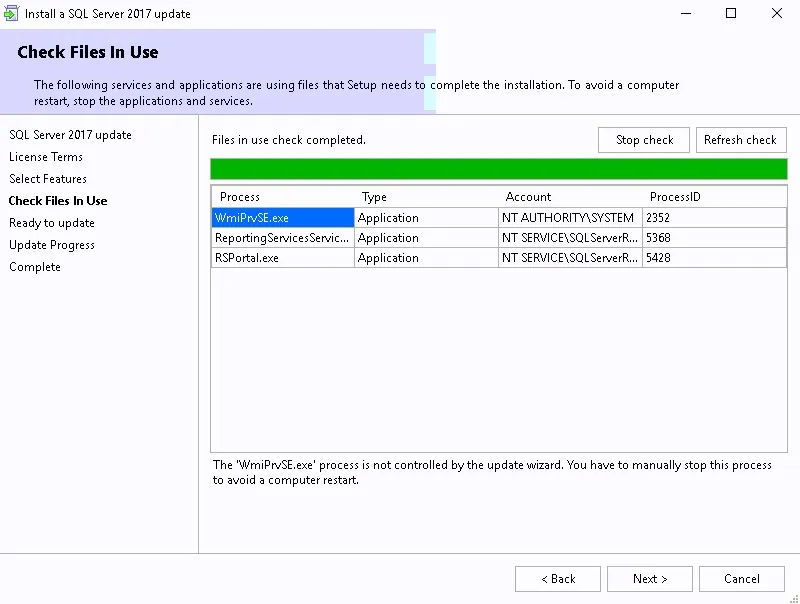
- Wait for Check File in Use and click Next

- Click Update
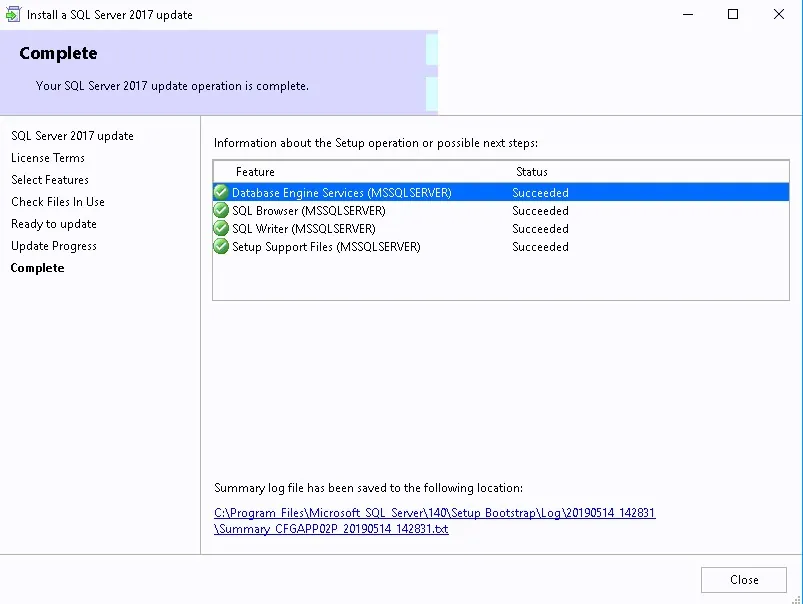
- Update completed, might require a reboot
SPN Creation
When you configure SQL Server to use the local system account, a Service Principal Name (SPN) for the account is automatically created in Active Directory Domain Services. When the local system account is not in use, you must manually register the SPN for the SQL Server service account.
Since we are using a domain account, we must run the Setspn tool on a computer that resides in the domain of the SQL Server. It must use Domain Administrator credentials to run.
Run both commands to create the SPN, Change the server name and account name in each commands.
- setspn -A MSSQLSvc/yourservername:1433 yourdomain\SQLSA
- setspn -A MSSQLSvc/yourserver.fullfqdn.com:1433 yourdomain\SQLSA
To verify the domain user SPN is correctly registered, use the Setspn -L command
- setspn –L yourdomain\SQLSA
SQL Configuration
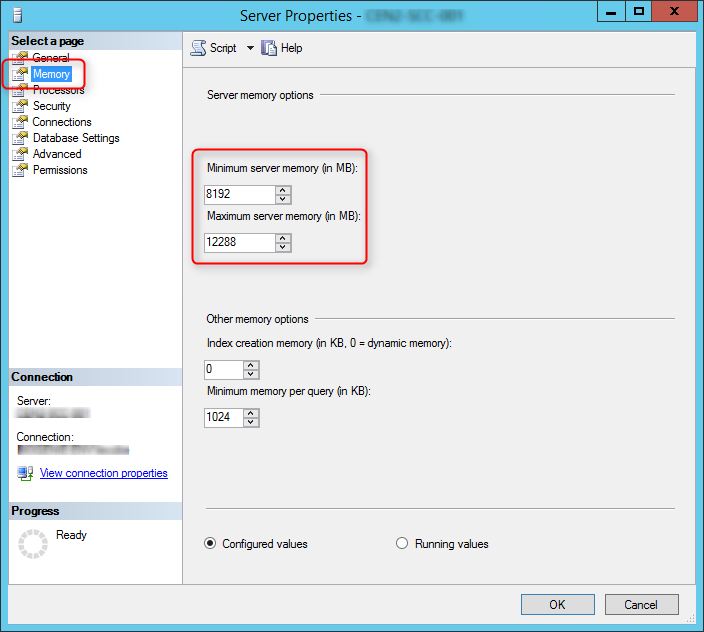
SCCM setup verifies that SQL Server reserves a minimum of 8 GB of memory for the primary site. To avoid, the warning, we’ll set the SQL Server memory limits to 8GB-12GB (80% of available RAM).
- Open SQL Server Management Studio
- Right click the top SQL Server instance node
- Select Properties
- In the Memory tab define a limit for the minimum and maximum server memory. Configure and limit the memory to 80% of your server available RAM. In my case I have 16GB available.
- Minimum 8192
- Maximum 12288
Database Sizing
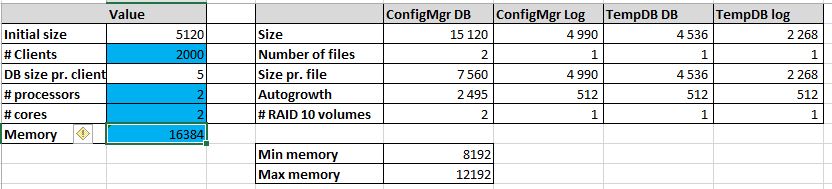
We always recommend to create the SCCM database before the setup. This is not mandatory, SCCM will create the database for you during setup but will not create it the optimal way. We strongly recommend to watch the The Top Ten Lessons Learned in Managing SQL session from MMS2013 which cover it all.
We follow the guide made by MVP, Kent Agerlund to estimate my DB sizing need. Visit his blog post and download the provided Excel file. Input your values in the blue cells and keep it for the next part. We’ll create the DB using those values using a script in the next section.
For this blog post, We’ve created a Database for 2000 clients, 2 processors, 2 cores and 16GB RAM.
Create Database
To create the database, you can use Kent’s script and input your values (as returned previously in the Excel file) OR use the following one which is really simple:
The Name value will become your Site Code during the SCCM installation. Be sure to select a unique Site Code.
- **Replace all XXX value with your 3 character Site Code**
- **Change the values of the Filename, Size, MaxSize and FileGrowth. Change the location of the file to your SQL and Logs drives**
[pastacode lang=”sql” manual=”USE%20master%0ACREATE%20DATABASE%20CM_XXX%0AON%0A(%20NAME%20%3D%20CM_XXX_1%2CFILENAME%20%3D%20’E%3A%5CSCCMDB%5CCM_XXX_1.mdf’%2CSIZE%20%3D%207560%2C%20MAXSIZE%20%3D%20Unlimited%2C%20FILEGROWTH%20%3D%202495)%0ALOG%20ON%0A(%20NAME%20%3D%20XXX_log%2C%20FILENAME%20%3D%20’G%3A%5CSCCMLogs%5CCM_XXX.ldf’%2C%20SIZE%20%3D%204990%2C%20MAXSIZE%20%3D%204990%2C%20FILEGROWTH%20%3D%20512)%0AALTER%20DATABASE%20CM_XXX%0AADD%20FILE%20(%20NAME%20%3D%20CM_XXX_2%2C%20FILENAME%20%3D%20’E%3A%5CSCCMDB%5CCM_XXX_2.mdf’%2C%20SIZE%20%3D%207560%2C%20MAXSIZE%20%3D%20Unlimited%2C%20FILEGROWTH%20%3D%202495)” message=”” highlight=”” provider=”manual”/]
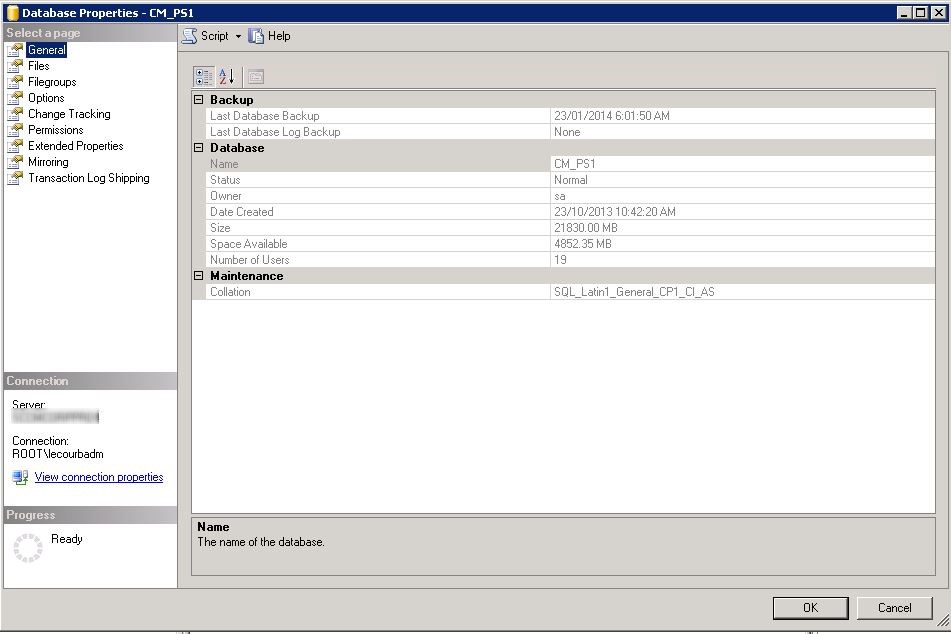
Review the Site Database properties
- Open SQL Management Studio
- Right click your DB, Select Properties
- In the General tab, verify that the SQL collation name is SQL_Latin1_General_CP1_CI_AS
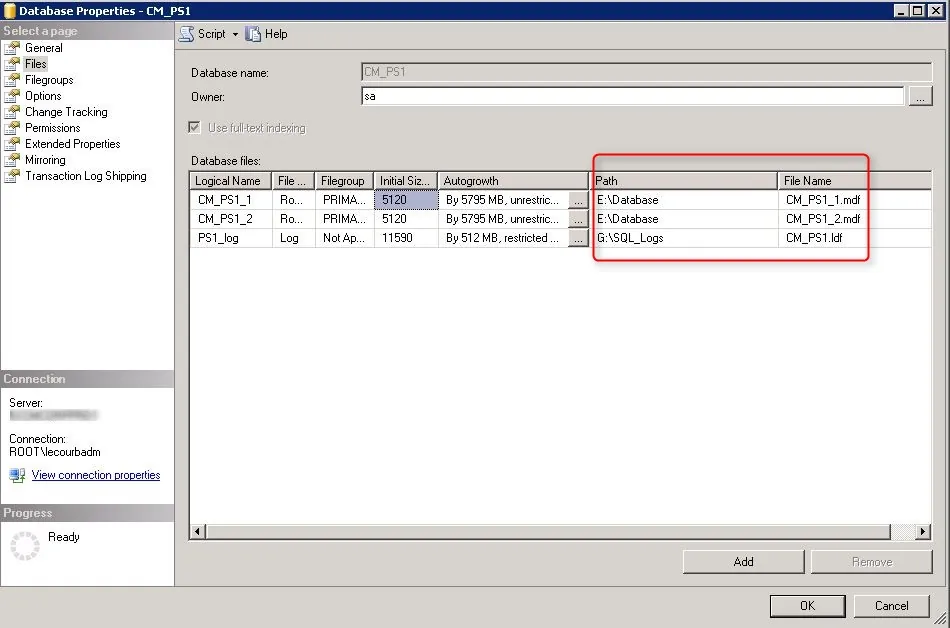
- In the File tab, verify that your database files has been created with the script value
- Verify that the file is located on your SQL Volume
- Change the database owner to SA. By default the owner will be the account which created the database.
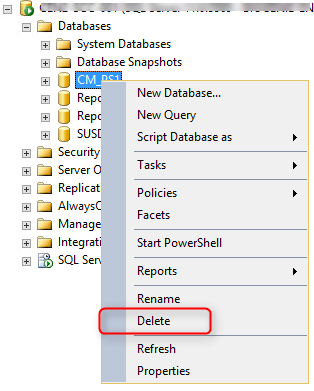
If you find out that you made an error, you can safely delete the Database using SQL Management Studio and rerun the script.
- Open SQL Management Studio
- Right click your DB, Select Delete
TempDB sizing
This section is left here for reference to help configure the TempDB in the installation wizard.
Run the following scripts to size the TempDB. (using the value returned by the Excel file)
**Change the values of Filename, Size, MaxSize and FileGrowth. Change the location of the file to your TempDB drives**
[pastacode lang=”markup” manual=”use%20master%0Ago%0Aalter%20database%20tempdb%20modify%20file%20(name%3D’tempdev’%2C%20filename%3D’F%3A%5CSCCMTempDB%5CtempDB.MDF’%2C%20SIZE%3D%204536%2C%20MAXSIZE%20%3D%20Unlimited%2C%20FILEGROWTH%20%3D%20512)%0Ago%0Aalter%20database%20tempdb%20modify%20file%20(name%3D’templog’%2C%20filename%3D’G%3A%5CSCCMLogs%5Ctemplog.LDF’%2C%20SIZE%3D%202268%2C%20MAXSIZE%20%3D%20Unlimited%2C%20FILEGROWTH%20%3D%20512)%0Ago” message=”” highlight=”” provider=”manual”/]
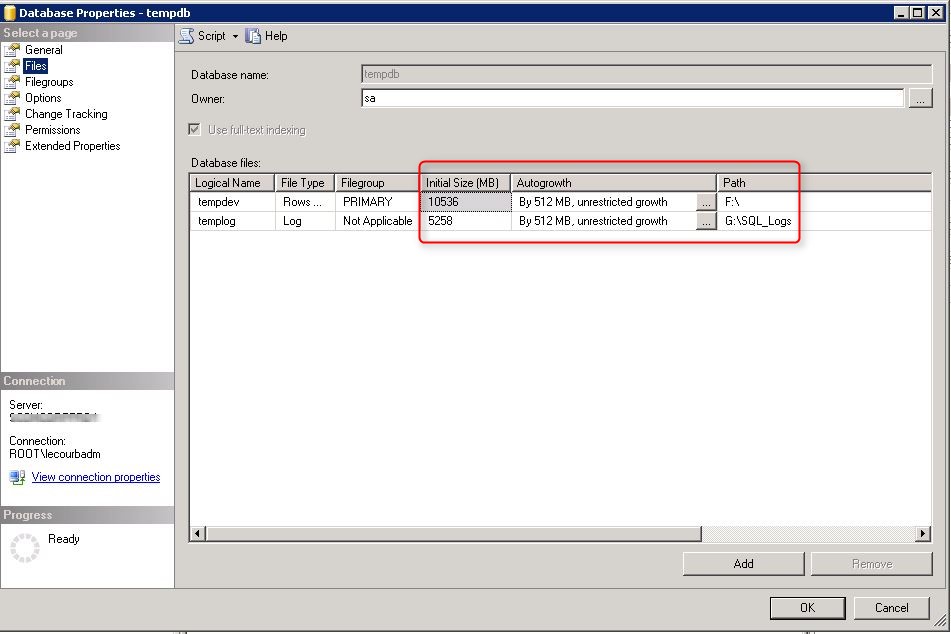
Review the TempDB properties
- Open SQL Management Studio
- In System Database, Right click the TempDB, select Properties
- In the File Tab, verify that your database files has been created with the script value
- Ensure that the TempDB and log are on the TempDB volume
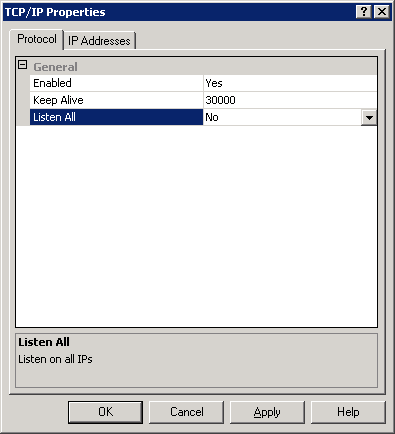
SQL Communications
To ensure proper SQL communication, verify that settings are set accordingly in SQL Network configuration
- Open SQL Server Configuration Manager
- Go to SQL Server Network Configuration / Protocols for MSSQLServer
- On the Right Pane, right-click TCP/IP and select Properties
- In the Protocol tab
- Enable: YES
- Listen All : NO
- In the IP Addresses tab
- IP1 (which should have your Server IP)
- Active : YES
- Enabled : YES
- All other IP and IP ALL
- Active : YES
- Enabled : NO
- TCP Dynamic Ports : Blank value
- TCP Port : 1433
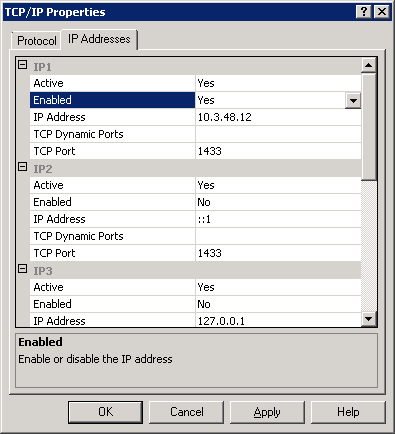
Once the modification has been made, restart the SQL Server Service.
The server is now ready for the SCCM installation. We hope that this SCCM SQL 2017 Install Guide was helpful.
Overview | SCCM Current Branch Step-by-Step Installation Guide
Next Part | How to install SCCM Current Branch
[ratings]
Share
Get the latest insights and exclusive content delivered to your inbox


Only authorized users can leave comments
Log In